
Patio Benches

Patio benches are always useful for visitors to sit on or just to add a place to balance plates while your acquaintances put away their quiches. At first these seem like a really simple idea. However there are a lot of banana skins waiting for the unwary.
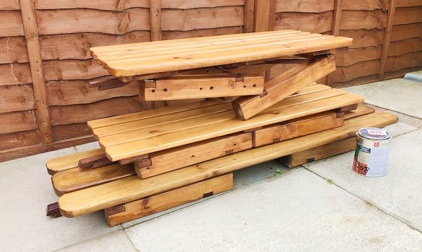
As with all my projects these were made from 100% recycled timber from old tables, a chair and an old child’s posh stair gate. The dimensions shown were just those I happened upon given the sizes of the original materials. Let’s see the tricky and not so tricky issues..
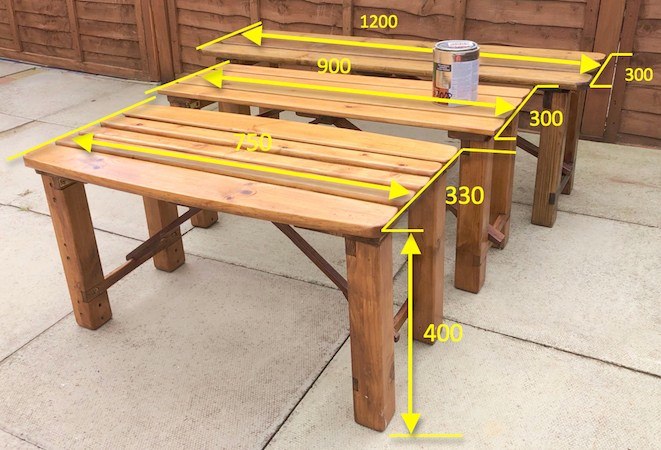
If your bench is going to support a quiche filled human adult or two, either sitting or standing (yes people do that !) then your benches are going to require a surprisingly large quantity of timber. Notable design criteria are:
-
✦Significant strength - hence both the horizontal spars and the legs must be sturdy;
-
✦They must fold away for storage - so if the hinges are not going to be the weakest point then good quality hinges will be required;
-
✦When erected they must not easily collapse so significant stays are required. They too must also fold away;
-
✦They must not over-balance if someone sits right at one end - so the legs must be in the extreme corners -thus there must be very little over-hang;
-
✦If more than one they should all be the same height. If not:
-
•people may fall over when moving from one to another,
-
•if you want to add a panel between benches the need to be the same height
-
•they will look more aesthetically pleasing.
These criteria work for benches of either identical sizes or differing sizes. You may of course design them so that they remain rigid and store the smallest inside the next size up and so on. However where will the diagonal stays, that keep the legs square, go ? Next let’s look at how to make them strong and durable.
Given that a bench must, under no circumstances, fail while in use one finds oneself presented with quite a few scenarios that must be planned for:
VERTICAL FAILURE
Firstly if the legs are in the corners then if someone sits in the middle then the whole ‘bridge’ between each end mustn’t give way - so your horizontal spans must be at least 18mm thick (If you were looking down on the top of the bench I’m going to call that a failure in direction Z ie downwards).
LEFT-TO-RIGHT FAILURE
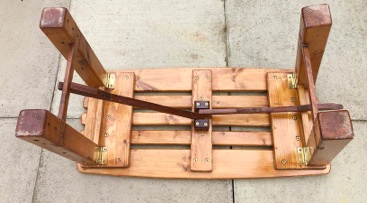
Next, it is obvious that if the bench folds then it mustn’t fold that way until told to do so (I’m going to call that a failure in direction X). By putting sturdy brass-plated-steel hinges at the inside top of each leg they cannot fold outwards. To prevent them folding inwards I attached a Stay to the centre of the bench. This forms an inherently stable triangle. In this direction the stays will only ever be in compression. Notice that they are a darker, stronger hardwood.
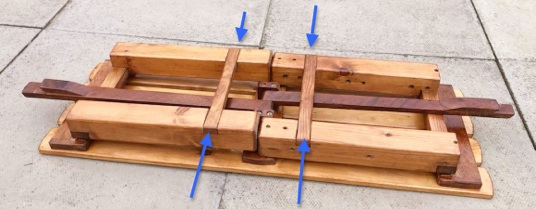
FORWARD-TO-BACK FAILURE
Lastly people rock back and forth when sitting -this is the bugbear of every furniture maker. The force can be huge and will cause a parallelogram distortion in the four legs at right angles to the previous two failure modes (I’ll call this a failure in direction Y). To prevent this I set a front to rear Stabilisation Bar (see blue arrows) into a very tight rebate in each leg tightly held in place by a woodscrew (not just glue). Of course they are also going to be subject to that nasty compression force (along Direction X) in their mid point -their weakest point ! I happened to have some more hardwood (albeit a bit lighter) so these look nice and slim but they must cope with these significant forces.
Design Criteria
Folding But Not Folding
Staying Power
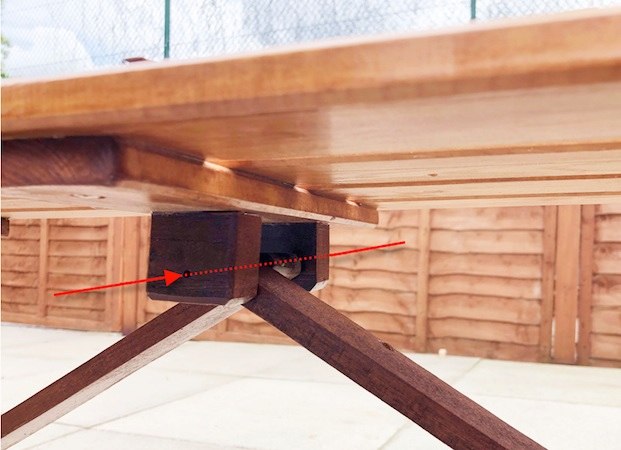
STAYS MUST BE SQUARE TO THEIR FULCRUM
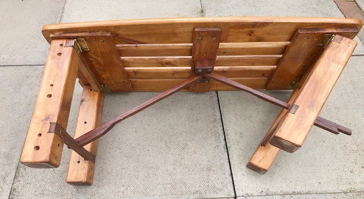
The stays must be attached at a fulcrum at the midpoint of each benchtop. They must only rotate vertically into position (Direction Z) about a common centre line (red arrows). I made the Furcrum Rod from some scrap 6mm aluminium circular bar. It bears between a pair of sturdy Fulcrum Blocks (mine happened to be hardwood but they don’t have to be). You must put these in a vice and drill them perfectly square. Likewise drill the holes in the top end of the stays, in the same way, perfectly square - no hand held guesses otherwise the stays will not meet at the midpoint of each respective Stabilisation Bar.
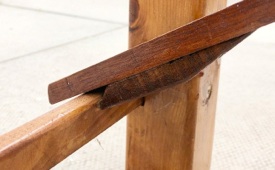
STAYING PUT
With the legs attached and Fulcrum Blocks screwed squarely into position, ensuring the Stays go above the Stabilisation Bars, cut them a little bit too long so they they overhang (purple line on inset picture).
From the same piece of wood make a pair of stay Locking Blocks. Slide each of these so that they push the Stabilisation Bars outward by about 5~6mm (pink arrow). Hold each one in place with a small vice and check the action. They should click nicely into place. If you’ve cut the holes for the Fulcrum Rod spot on size there should be no play and everything be tight. Remove them, glue the common face and re-set into place with a vice to cure overnight.


Weather Proof
VARNISH PREVENTS TARNISH
I’m not going to recommend one commercial varnish over any other. However I have found that one well-known brand consistently out-performs all the others. None of the good quality varnishes are cheap.
What I will suggest, though, is to buy one either that already has a golden colourant added to it or, like me, that you add your own. Remember that the colourant must be soluable in the varnish - you cannot mix solvent based and water based substances !
COLOURANT FORMULATION
I use a well-known brand of wood dye and pre-mix three parts “Antique Pine” with one part “Dark Mahogany”. I then add 1ml per litre of this mix to clear gloss varnish. You will need to mix this in well so put the lid back on the varnish and gently rotate it for 3 minutes. Do not be tempted to shake this vigorously as you will add bubbles of air that take quite some time to float out of solution - and worse can cause the drying time to reduce and the brand that I use already starts to dry rather quickly.
You will need two coats. Allow each coat to harden overnight and sand all exposed areas lightly with fine sandpaper between coats to give an utterly smooth finish (almost like French polishing).
Hopefully you will protect your benches from the most severe of the weather but in time they will need sprucing up. When you come to re-apply always sand down any damaged areas with medium-fine sandpaper and re-apply two coats. I’ve only needed to do this every 3 years.
Good luck - I hope that you have success !
matt’s shed
mens shed
shed projects
shed ideas
Disclaimer
Whilst some care has been taken to check externally linked websites no responsibility is offered nor implied for the suitability, legality or reliability of content therein.