Pixelmator Helps & Quick Tips

Basics Of Layers
Warnings
Mac Only
Cutting their professional customer base down a little at present Pixelmator will only run on OSX.
Pixelmator Is Not Intuitive
Until a recent update none of the hovers worked on any function so you couldn’t learn what the non-standard symbols were called -let alone how they worked. This is why there are so very many tutorials on YouTube. However YouTubes are another bane. I hate having to plough through some nerd’s dribbling voice only to find he doesn’t actually answer the one little detail that I’m missing. This’s why text webpages are better because they usually have a menu and can be searched - video can’t (yet). To be honest I’m not very happy with some of them and so, as I mainly do overlay, I decided to write this webpage with that bias to help anyone interested - including me !
Pixelmator’s Unique Phraseology
Sadly the team that wrote it must never have used any other correction tool except Photoshop. Throughout the rest of the industry are standard symbols and phraseologies but Pixelmator strangely applies them to other functions. The tools on the left of the work area you think you’ve seen in other apps work in quite a quirky way and their controls are not obvious at all. Certainly the finger ‘Smudge’ is a complete disaster. Another that you will frequently use is the area selector with the ridiculous name ‘Marquee’ which isn’t recognised by Wikipedia or used any other apps. I thought I was going mad. It also has a ‘Lasso’ variant of it which once joined up can’t be edited other by Lassoing areas nearby following the rules you forgot to set in another dropdown somewhere else. Another example is ‘Stroke’ which is a line or border - I know of only one other niche application that uses this name. Do beware that a brush stroke is something different.
Throughout there’s confusion which just piles up my feelings of a complete lack of control. Fortunately, at the moment, ‘Cmd-Z’ is still undo. Anyway we’ve gotta get over it, it’s published software now and they won’t change it.
Help Is Online Only
You will need this a lot. Yet, common to so many apps these days, annoyingly it’s an online feature only. If you work on a laptop, say on a train, you’re scuppered. And worse..
Dreadful Help
As I said Pixelmator uses its own phraseology and never mentions any other popular names for processes that you may have come across before. You’ll find that the Help is nearly all text so incredibly there are very, very few pictures to describe what’s going on in a picture editor. That seriously hampers ! Obviously processes may be a sequence yet there are very, very few cross-references within their own Help system.
Other Sources Of Information Are Hard Work Too
As its own Help is as user friendly as a rattlesnake one will need to turn else where for inspiration all the time. I mentioned the large number of onerous YouTube and online tutorials but until you really start to need them you realise that because they took so much preparation the websites demand that you pay for them (remember all those books Windows 3.1 for Dummies etc ?). Yawn. However there are so many basics that are not obvious these tutorials tend to contain large quantities of the same basic advice lumped at the start. You will find the easy things very difficult (like cropping a single layer is impossible -see below) and the difficult things easy (like wonderful mathematical filters to transform coloured areas or even semi-transparent cloning). I guess the programmers were geeks not artists.
Beware Amazon Manual - it’s monochrome !
Amazon sell a manual written by a third party. However I strongly recommend you read the customer feedback as the contents describing this convoluted picture editor are in black and white and are highly criticised by everyone reading it. I’ve decided not to waste my money.
At Last A Better Manual
As in the best Windows environments if you don’t read the manual you won’t have a clue. It’s been hard to find but on a Slovakian website I have finally found this vital reading. It is 40Mb for the 2009 v1.41 of the app. At time of writing July 2016 I am currently on v3.5 so I guess quite a bit has changed but it is well produced and worth reading:
SUMMARY
For the money Pixelmator has many superb features but if you are new to this take three high patience pills and start early in the morning ! As I’ve had to wade through hours of dross and to act as a reminder I will now jot down some quick tips..
You must understand Layers.
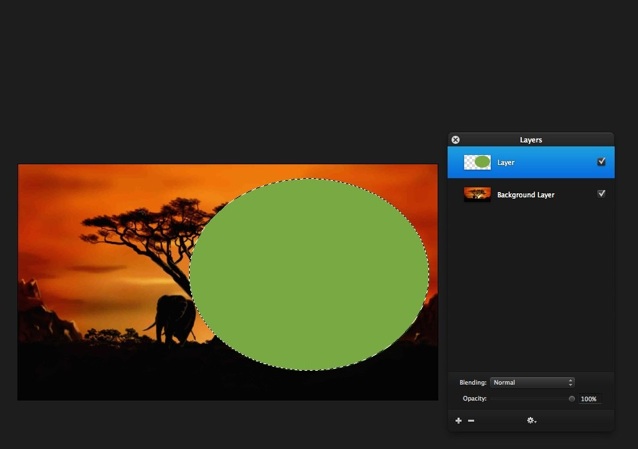
To see the Layers palette: View > Show Layers (Cmd+2)
When ticked layers obscure each other. Logically the viewer is at the top of the palette, by the word Layers, looking down.
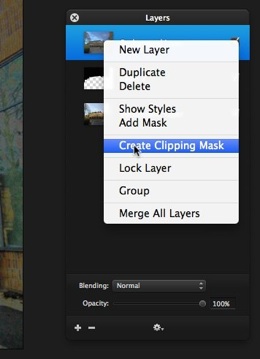
Again logically any picture added is placed on top of those below. Hit the little ‘+’ at the bottom or two-finger-click to add a new layer (I show a green ellipse has been added).
Layers may be renamed by Double-clicking the name. Rather annoyingly by default new layers are given the name “Background Layer” rather than Layer1 etc. They may be placed in any order by dragging. Don’t be duped just because it is named Background it has no special qualities that I can discern other than that’s its stupid name !
The Dreadful Crop Command
The layer being modified is outlined in royal blue. With one common bastorical exception: Crop. This crops ALL layers. This cannot be changed. You have been warned. I can think of no reason for this to be so annoyingly stupid.
De-selecting: Cmd+D
In any window if you find yourself tied up in selections the one command to remember is:
Cmd+D
This De-selects everything -getting rid of all those annoying dotted lines that creep. Some tutorials refer to them as ‘crawling ants’.

Basics Of Compositing 1 - Separate Mask
You may know Masking as: matting or alpha-channel. It’s used a lot in the film industry to hide objects or to alter part of a picture, film or video. Pixelmator has two ways to do this. Either: create a Clipping Mask Layer or use a hidden red layer.
1.1 Use Of A Clipping Mask
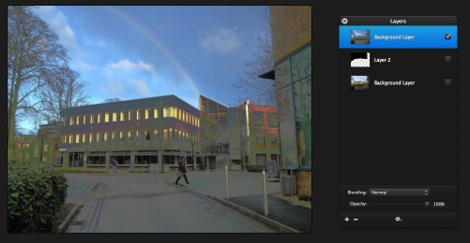
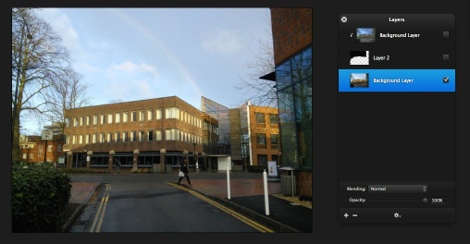
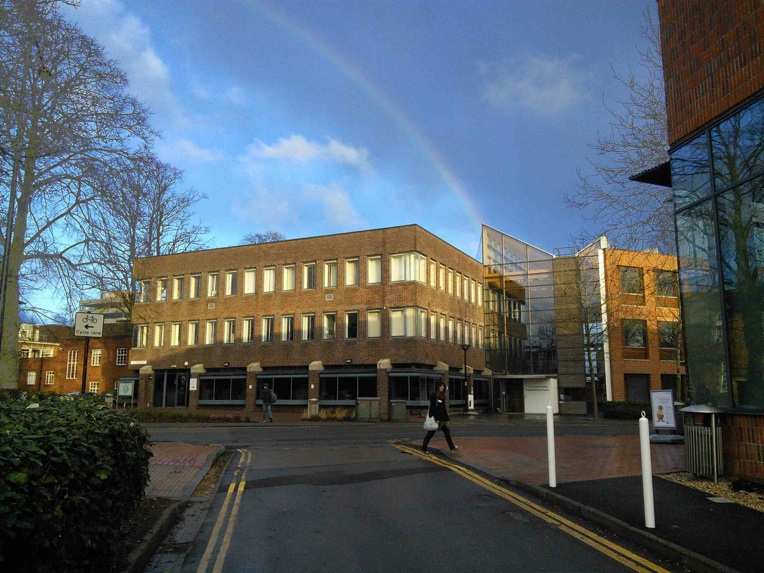
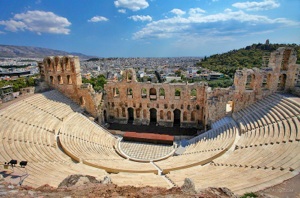
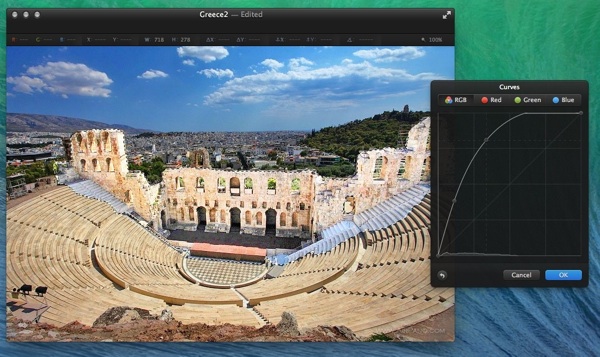
The first picture on the right shows a rainbow over a building but it can only just be discerned and the sky is not very blue. The second picture shows what happens if one were to enhance the whole picture. You will notice that the buildings look exceedingly unnatural.
What is needed is distinction between those parts of the picture that should be adjusted and those to be left alone.
Such a device is called a mask.
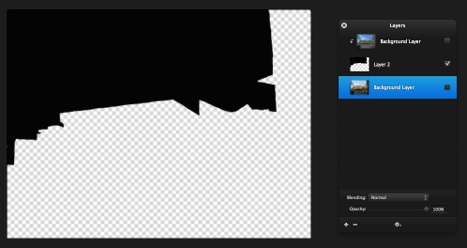
A mask must be placed in the Layers palette as the next layer IMMEDIATELY BELOW the image that it is to operate on.
Next two-finger-click this layer above and select ‘Create Clipping Mask’. A tiny down arrow will appear to the left to show this has been activated.
To de-activate two-finger-click again and select ‘Release Clipping Mask’.
In order to perfect the area of foreground over background turn all the layers on (make sure that they are ticked), select the mask layer (here ‘Layer 2’ is highlighted blue) and modify it with black paint or the eraser whilst observing the edges. It can also be useful to turn some layers off to ensure you can see there are no holes in your work. Edges do not have to be ‘sudden’ they can be feathered grey to produce a smooth transition.
There is a very verbose list of shortcuts in the Pixelmator help. This will always be accurate for the most up to date versions. However for Pixelmator 3.3.1 (2014) here is an excellent memorandum from the Dashkards website. You may click on this picture here to download a pdf version.
Just a few that are useful here:
Shortcuts
I’ve found very few really concise tutorial sites. The nature of picture alterations is a progression so it’s not surprising that most function descriptions build upon what they’ve done before which often is confusing. What I wanted was a short explanation of just one function at a time -not a whole arty treatise. I’d prefer to do that myself but that’s not the view of most of these talented guys. Here is a list of ones that I’ve found who give somewhat helpful descriptions:
Richard Harrington -indexed list of short YouTubes (not all seem to be available but a transcript of the verbiage is).
Lifehacker - a new guide for people swapping from Photoshop to Pixelmator complete with a grab of Dashcards shortcuts. Good.
Other Tutorials
Basics Of Compositing 2 - Quick Mask
Previously we saw that it is possible to set out certain parts of a picture to give them special treatment. If you just desire a selection and you don’t wish to save that selection for another time then using the Quick Mask feature is helpful.
Here is an example. You send your errand boy out to photograph The Great Amphitheatre but he gets there late and there is a shadow across the whole of the front portico. You are disappointed and may decide to send him out again. There is an alternative...
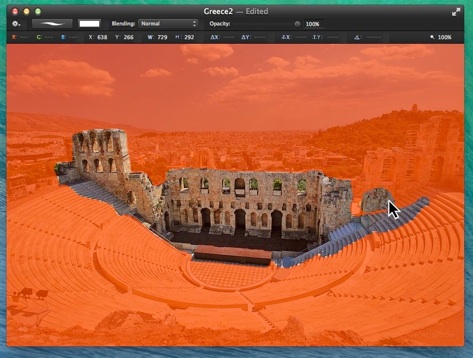
On the keyboard press the letter Q. You will get a bright red sheen over the whole picture. Holes may be made in that red Quick Mask with any brush size and shape. Painting black removes areas of mask and painting white puts the red mask back.
Basics Of Compositing 3a - Pixelmator Chromakeying
As we’ve seen the mark of a competent picture editor is its ability to key one picture over another and the most powerful method is self-keying. That is using some characteristic of the existing picture itself to generate the mask AKA Chromakey, Colour Separation Overlay, Bluescreen, Greenscreen, Yellowscreen etc (I’ve only ever seen this latter used in television Sports graphics).
Keying requires preparation and so I make a few suggestions in Subsection 3.1. In Subsections 3.2-4 I will describe the professional keying methods. This mode is one of many Pixelmator hidden secrets. Then in Subsections 3.5-7 I will describe a similar way by cheating which may not always work. Anyway keep at it - it’s worth it..
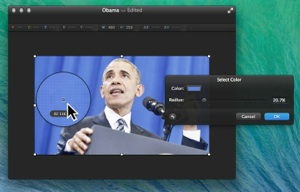

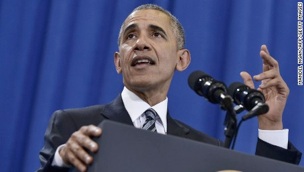
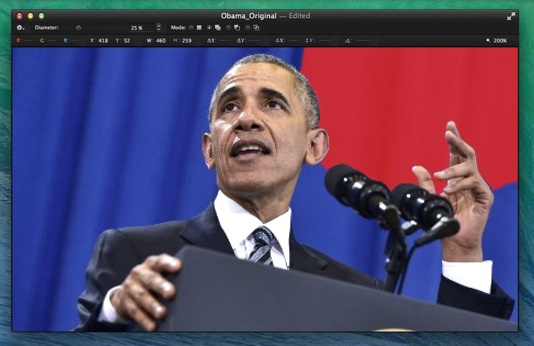
3.1 Preparation Of Foreground And Background Let’s look at a simple task of overlaying an indoor shot of President Obama over an exterior of Blenheim Palace. The first things to get right are outside of the scope of detail here but that the lighting, particularly the black level, the colourimetry, the perspective and the resolution of foreground and background must be close enough to fool the observer in the final composite. Notice that this interior view of Obama is rather dark therefore before starting I have used the Curves tool to increase the contrast of the whole picture. This will also help the software separate the foreground from the parts of picture to be discarded. The final background picture may also need to be tweaked at some point but it is not as useful. Now make sure both are loaded into the same Pixelmator view with the foreground layer above the background. Often the foreground will be significantly smaller than the backgound.
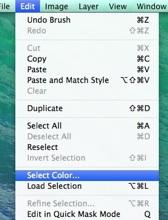
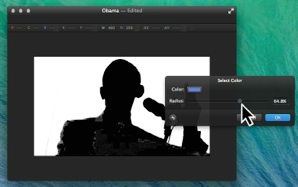
3.2 Select Axis Colour Keying has great limitations because, unlike manual masking above, the software has to decide what picture material is in and what is out. Generally only one colour can be cleanly removed. Yet in real life materials are a range of brightnesses, hues and saturations. This is why film companies shoot actors against a single pure colour so that subsequent keying can be achieved in the least problematic way. In our world we have to deal with imperfect situations. We need to select the colour and ranges of that colour that we will remove from the background. The tool for this is hidden euphemistically in the ordinary Edit menu. It is a subtle but vital tool.
Once opened hover the circular selector over the least saturated part of the background that you want to be removed and click. The colour that you have selected will appear a box in the tool window.
3.3 Select Colour Radius Grab the slider control and adjust the Radius control. As usual I hate the nomenclature used for these things but it is widening or closing the range of acceptable brightnesses and hues that define what is in or out. Whilst holding the cursor on it the entire full frame picture displays the black and white key that you are about to use. If the slider is too far left nothing will get keyed and if too right everything will so place it where there is a clear delineation. Aim for the least amount of indecision on edges. This will be a compromise because often there is break-through of background into foreground or vice-versa (Notice I have left a bit bottom left).
If you are struggling it can help to re-select the colour again. This is the time to experiment.

Disclaimer
Whilst some care has been taken to check externally linked websites no responsibility is offered nor implied for the suitability, legality or reliability of content therein.
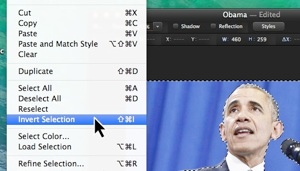
14. Invert Selection In keeping with other parts of Pixelmator the black part of the picture is the selection that will be discarded. Oh no - that’s the bit that we want. Therefore merely invert this which is an option just above Select Colour in the Edit menu or press Cmd+I.
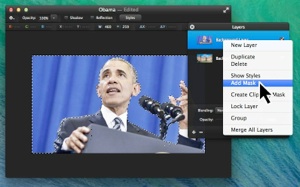
3.4 Add Mask Finally we can see what we have been looking for - a composite. Whilst still having the foreground selected in the Layers palette right-click the name of the layer and select Add Mask and bingo you get your composite.
Finally de-select your foreground and the “crawling ants” display will disappear. At any time you are free to re-position and re-sized your layers in the usual ways.
It is sad that we cannot make the colour keying adjustments of subsection 3 here live. However there may be internal reasons for that.
Next I describe a method of cheating which often works.
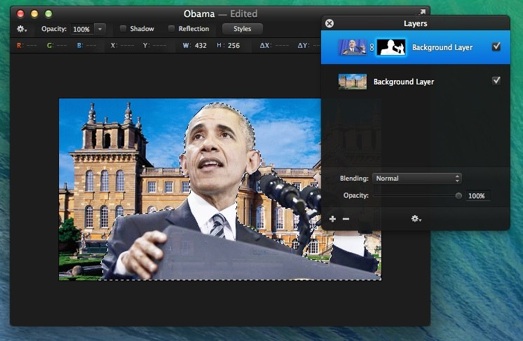
You will see a little link symbol appear and a black and white mimic (the inverted way round) just to the right in the Layers palette.
Layering Tips
To aid editing the mask layer sometimes I find it useful to Add New Layer, drag it to the bottom, fill it with a contrasting colour (eg red as our eyes are most sensitive to changes in saturation in red colours) and temporarily turn off the background. It can also be helpful to magnify the whole lot (Cmd +), go to the mask mayer and tweak any imperfections.
Here is the finished composition.
Good luck.
You could send your bungling assistant out again but there’s a deadline for the printing of the brochure so you paint out only the shadowed parts of the picture. On the keyboard press the letter Q again. You then get the image on the right. The area you painted has become selected, with its perimeter “crawling with ants” in the usual way. You are now free to use your favourite tools to modify anything within that selection. Here I’ve used Curves again -however I’ve made the portico and steps far, far too bright to show you that just these parts are being affected.
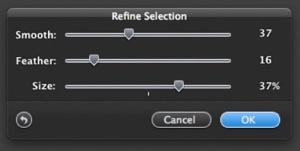
In order to ensure the least visible transition from the Edit menu or Shift+Opt+R use the Refine Selection tool (right).
It’s useful sometimes and made a big deal of in the manuals and online tutorials. There are some handy shortcuts:
Keyboard Shortcuts
For speed to:
-
i)to set the default brush colours to black and white just press the letter D.
-
ii) to switch between them just press the letter X.
Basics Of Compositing 3b - Cheating With Magic Erase
3.5 Preparation Before keying please read the suggestions in Subsection 11.
3.6 Cheating The reason that this Section follows the previous is that it is essentially the same except for the very first active step. To avoid confusion I will use the president Obama example again. This time instead of using the Select Colour tool we will possibly speed up the process by using the Magic Erase tool. However it’s not perfect. Magic Erase has four modes. Select the second mode, Additive, which will make every area that you highlight add to the previous ones.
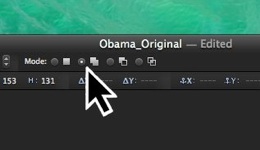
3.7 Magic Erase In the controls on the top line set the Diameter to roughly 1/16 the size of the picture, here 25%, and drag the little circle over areas that you want to remove -immediately it samples the background and highlights in red all colours with similar brightness, hue and saturation. Red is chosen because it’s like the Quick Mask and because it’s the colour least chosen for chromakey (because it is the most prominent colour in human faces).
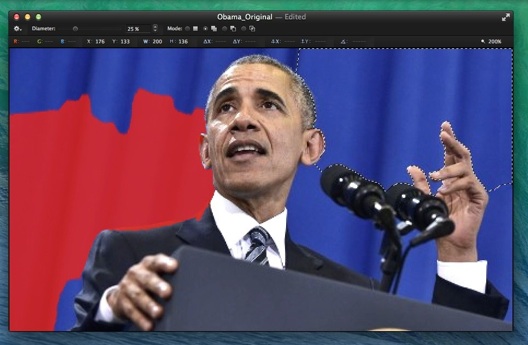
Looking at the left picture above you see that I started on the right-hand side and the red highlighting immediately flowed around Obama’s fingers and microphone. With the mouse down the little circle had only needed to be dragged a tiny amount for a large amount of red to become highlighted. This is because this tiny movement sets the range of brightness, hue and saturations in that local area that are included. They need not be blue but any colour. This is not chromakeying but simply erasing a chosen portion of the red mask. It’s useful because you can remove any colour background and is quick as long as there isn’t too much detail to fiddle. You must repeat this operation many times. Because we set Additive build up when the mouse is released the new area of red will be added to the previous ‘crawling ants’.
Looking at the right-hand picture above, in order to highlight the very coarseness of this tool, you will see that the left-hand red area has significantly overlapped Obama’s shoulder and jacket lapel introducing a nitch where it was slightly whiter than the rest (orange highlight). This tiny movement is easily over-done in this way. To rectify this one could use the third or fourth modes, subtractive or Exor, of Magic Erase but in practice this can be very fiddly and you’ll probably just Ctrl+D to start all over.
For this reason cheating, just like making bodged home repairs, can be more time consuming in the long run than doing it properly in the first place. It totally depends on the material and your skill.
When you have finished this step you should have the correct areas fully highlighted with ‘crawling with ants’. You can now carry on just as above by inverting the selection.
Goto to Subsection 14 above.

Keyboard Shortcuts
For speed to:
-
i)to set the default brush colours to black and white just press the letter D.
-
ii) to switch between them just press the letter X.
-
iii) to force constrain proportions hold Shift while using mouse
-
iv) to disable snaps hold Cmd while using mouse.
Layer Blend Modes
On the Layers palette if you two-finger-click a layer name there is the option to Add Mask or Create Clipping Mask. This causes two layers to blend in some way with one-another. Throughout the descriptions here we will leave the Blending mode set to Normal. This means that there is a hard overlap of one layer over the other and the Opacity control does what it says. However the are many other ways in which an interaction can occur at a pixel by pixel level. Some of these are very subtle. In fact all are the same as those used by Photoshop. Rather than waste space here describing them here are links to:
(these descriptions are also true for Clipping Mask Blend Modes)
Photoshop Layer Blend Modes Explaned -a description of each blend mode:
Photoshop Layer Blend Modes -more by a different website.
Photoshop Multiply Mode -further detailed information
I will now describe four methods of compositing using: 1. Separate Mask, 2. Quick Mask and 3. Chromakeying. The latter is followed by a cheat which sometimes saves time.
Layer Mask & Clipping Mask Confusion
Because Photoshop is totally confused as to why one of the writers included two methods of doing almost the same thing so is Pixelmator. One little breather of a clue is that Layer Masks only affect the transparency of one layer and Clipping Masks affect multiple layers above them. Err I think ? If you Google to find the difference you will find experts don’t agree. Thus at present I’ll leave it to you to wade through the stupid YouTube tutorials to find out which one you ‘should’ use in which particular circumstance. Pixelmator doesn’t support Alpha-Channels so it’s off to a flying bodge anyway. Confusingly Clipping Masks and Layers (but not Layer Masks) have a Blend mode (see next item). It’s complete crap and someone should have got their head around all this a long time ago (they will by v64.7 !).
This blog, explaining Photoshop, is the best attempt that I’ve found so far: Getting-to-know-clipping-masks-and-layer-masks-in-photoshop
Also for Apple Mac Users
See my page: Mac Stuff
Due to its relatively low price Pixelmator has quickly become a popular picture editing tool. It is capable of some incredibly good picture correction and alteration effects which mirror those of the highly priced Photoshop and it even uses the similar icons. Both items of software are awkward to use but I’ve learnt to live with this and this page is as much a reminder to me as I hope it’s a help to you. Of course there’s worse software out there -have you ever tried to set up consistent multilevel TOCs in MS Word !