It would be nice if any water collection system worked purely by gravity. However that’s not always practical but using a modern Internet Of Things device means that it is far less expensive than you might think and will tell you what’s going on - anywhere in the world ! Here’s my first foray into the market..
I hope you end up as pumped up with pride as I was !
matt’s shed
mens shed
shed projects
shed ideas
Rainwater Pump Control And Monitoring
Using A Shelly
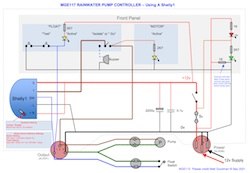

Front panel legend & circuit diagram (click to download)
Reason For Construction
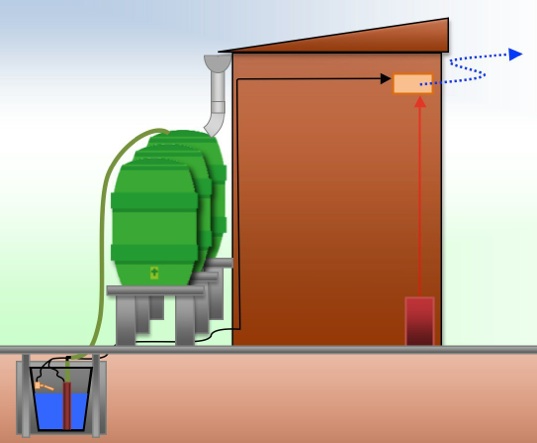
Climate change has meant that my garden suffers badly from water stress. Many plants, which I thought might survive, have just died. There are large hedges either side which don’t help but I need to hang on to what water I can when it comes down from heaven above. I had already been collecting water from the shed roof for a few years and storing it in three of the largest water butts available. However their stock runs out fairly quickly and if there’s a shower I get hardly any top up. Therefore from my various other flat surfaces around the garden I installed 20mm plastic electrical conduit pipe (because it’s cheap). It would look nasty having this above ground so I installed it with ease under various runs of slabs. I welded any connectors together using the normal plumbing jointing compound to ensure a water-tight seal. The pipes lead to a sump at the lowest point.
The tank contains a submersible pump and float switch. This latter triggers a timer in the shed to transfer the contents of the sump into the first water butt. As the Shelly1 IoT controller is supposed to be so easy to use I installed that inside a control box with various lights, switches and a fuse to allow testing for correct operation and protection. Once I’d sussed the Shelly it worked first time.
Sump
Central heating loft reservoir tank. Black rugged plastic 18L. I buried this and surrounded it with small slabs to prevent it being crushed. A lid is available if required.
Cost: £8.
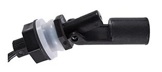
Water Level Sensor
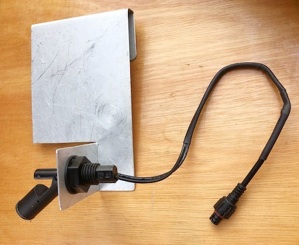
I used the most robust and smallest available. When the water level is low the internal contacts are Normally Open (NO). It is sealed with electrical leads 300mm long. It requires a 15mm hole. Specification says that it’s maximums are 240v 0.5A. However I know that they use a tiny magnetic reed switch internally so keep the current well below this. It cannot drive any motor or lamp directly.
Cost: £4
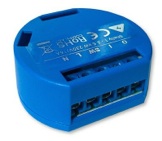
Relay & Timer With Internet Connection
This is an all singing, all dancing, device that can be controlled from, and report back to, any internet device incl mobile phone. See here for set up: Shelly 1 Configuration. The beauty is that they run perfectly well stand alone with no internet connection. Use your mobile to connect to it locally to adjust the timer and see how many tanks of water it’s lifted. You may choose to use some form of adjustable timer and 8A relay.
The cheapest and very quick delivery is from Shelly themselves. For their details see: Shelly1 Buyers Guide & Spec
Cost: £9.
Project Enclosure
Strong plastic box with an aluminium front panel to which I stuck the legend (above) and drilled the holes (in that order) for the controls.
Purchasing Problem: Whilst there’s a huge range of boxes for this project available I could find none like I’d used so I suggest that you buy a fully waterproof ABS box and replace the cover with 2mm aluminium. Holes were made using a stepped conical drill.
Cost (from my own stock) but approx £10
Connectors
Due to the large current demanded by the pump I used high current audio XLR connectors (rated at 16A). I suggest using different gender connectors for inputs and outputs.
Cost £2.50ea
Cable
Even though everything is low voltage I used black 3 core 1.5mm2 mains cable (rated at 17A so there’s minimal volt drop).
Cost (from my stock): £0.6/m
Power Supply
Use a 12vdc supply that has at least 20% more capacity than you expect to need. Mine was a 10A switched mode in a custom box with additional fusing and connectors.
Mine came from China. Cost £10
Items Required


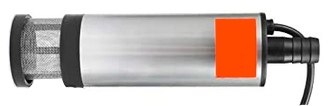
Pump
This is the star buy. I found a 51mm stainless steel Qlouni centrifugal pump with a rated capacity of 35L/min at 12v. Its current demand is very much dependent on the load. The impeller is protected by a large stainless steel filter which can be unscrewed for cleaning. Output nozzle is 19mm which I reduced to 13mm hose. I raise the water 2m, it emptied the sump in 1min and threw the water an additional 1m up in the air !
I have to give Amazon their due: Qlouni Pump. Cost £14.99
A simple project to prolong the life of my garden flowers
Installation
Whilst I understand that you will not want to install your system the same as mine here are some notes on what I did so that you can learn from the experience.
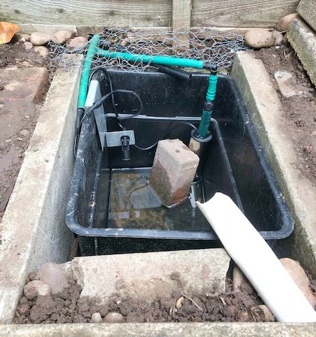
You can see that the float switch-switch hangs off the side and triggers when the sump is 2/3 full. The brick is not there to hold the pump in position but provides pressure to keep it in the corner so that a frog can comfortably wiggle its way up that corner using the suckers on its fingers and toes. The chicken wire is there to prevent them and rodents getting in in the first place.
A
B
C
-
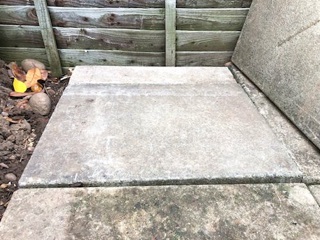
A.The sump covered fully.
-
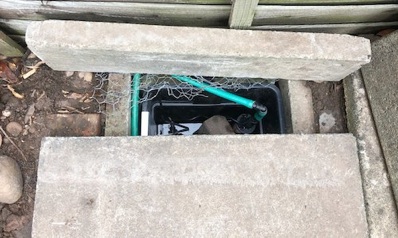
B.The inspection hatch lifts easily. One green hose-pipe protects the cable from attack by hungry rodents.
-
C.The sump fully uncovered. As it will be pressed on four sides and crushed by a cover I surrounded mine by two 400mm slabs held apart by two 300mm slabs which were each 400mm deep. The far 300mm slab is 40mm deeper to allow the pipes and cables to enter (the near end, with the white pipe, didn’t need this).
D
E
F
-
D.The float switch. It is mounted on a simple aluminium panel for easy removal. It and the pump are connected via miniature Chinese waterproof connectors.
-
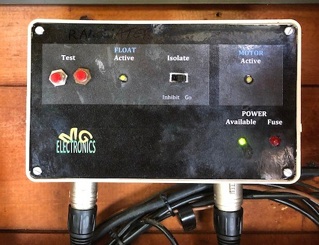
E.The control panel. In normal operation with the power switch (not visible) on “Power’ is shown “Available”. If the “Fuse” blows then a red indicator flashes. If the “Isolate” switch is set to “Go” all will be automatic. To test the Shelly the operation of the float switch can be mimicked by pressing the two red buttons at the same time (to avoid inadvertent triggering by tools in my garden and burning the motor out). This feeds the SW input of the Shelly lighting the “Active” indicator. The output of the Shelly feeds the “Isolate” switch which in the “Go” position feeds the motor and the “Motor Active” indicator. However when set to “Inhibit” the output is sent to a buzzer only (not the motor) to prove that the Shelly is working.
-
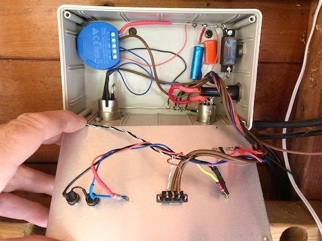
F.Inside the control panel. This acts as a central connecting hub for the various cables and allows testing in the event of a fault. Do fit a fuse ! I have a friend who set fire to a system that he built and it was a sorry end to a great investment in time and money.
-
G.Current consumption of pump working against a 2m head.

G


Internet Of Things
Internet Of Things
Disclaimer
Whilst some care has been taken to check externally linked websites no responsibility is offered nor implied for the suitability, legality or reliability of content therein.