
SD Player
Disclaimer
Whilst some care has been taken to check externally linked websites no responsibility is offered nor implied for the suitability, legality or reliability of content therein.
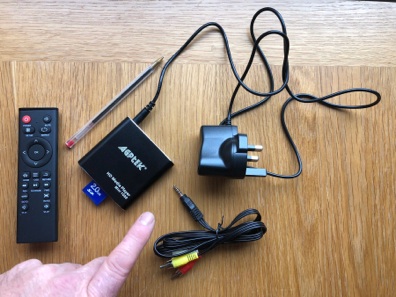
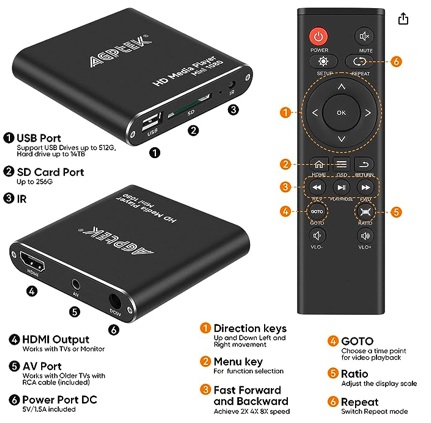
AGP Tek: Mini HDMI Media Player HA0053B
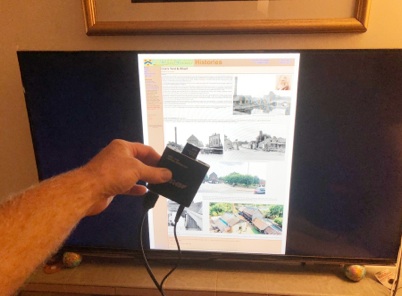
A full HD mini player that fits in your hand. Storage on SD or USB. Output is HDMI (incl 20bit audio) or analogue AV.
It is designed to play full length movies while on holiday but has a lot of other uses too.
Page last updated: 23/9/2022
Purchasing
I bought the unit from Amazon for £39: HD Media Player, AGPtek Mini 1080p Full-HD Ultra HDMI Digital Media Player with Remote Control
However their price seems to vary considerably so pick your moment. The ones available on eBay are not identical - certainly several are the older model.
Useful Features
It supports a huge number of file formats controlled with a host of features, including music playback whilst stepping through stills. You can have as many folders for material as you like -simply navigate to it and Press OK.
The output resolution is full HD and works perfectly. However, like so many Chinese devices, media is played in the order that it was recorded onto the storage device, not always the alphabetical order that you see in your filing system, although it will be close. Tips on the filing system are shown below in the green panel.
Stated Formats
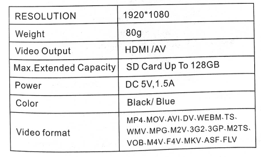
Changing printed material sometimes lags the software. The printed manual says these are the formats that it supports..
More Formats
However the seller makes these claims (the most useful I’ve highlighted)..
-
Video format:
-
RM, RMVB, AVI, DIVX, MKV, MOV, HDMOV, MP4, M4V, PMP, AVC, FLV, VOB, MPG, DAT, MPEG, TS, TP, M2TS, WMV
-
H.264, H.263, WMV9/VC-1, MPEG1/2/4 (H.264 mp4 format supports up to 4G per file and 128G in total).
Power Supply
The “Power” listed in the website’s Features above is the capability of the supplied mains adaptor: 1500mA. The manual says that it is 800mA which seems 10x what I’d expect so I’ve measured the actual power consumption and it is a fluctuating 14mA at 5v. This is usefully a lot less than 1A which means that any USB power adaptor could be used.
Experiment Indeed most TV’s have a USB connector on the back. These always supply 5v limited to 1A. Thus it may be possible to obviate the need for a power adaptor completely. So I made up a lead and tried supplying from a USB. However the SD Player would not properly reset -it puts up some words but then seems to get stuck in a relaxation oscillation loop: blanks the screen then puts the words up again. In order to avoid earth loop issues I had used a large lithium powerbank. I know internally that they have a 3.7v lithium flat phone battery and a charge pump to make up to 5v -thus they oscillate internally. Whilst this is very high frequency, and should be smoothed out, there’s a tiny possibility of a harmonic disturbing the LSI inside this SD Player. I’ve therefore stopped my investigations in case the SD Player gets damaged. I now have to run off the mains adaptor supplied. If you try this please inform me of the result (email is on Home page) ?
My Experience
Memory Card Source Formats
Features
Manual
Tips

Screens
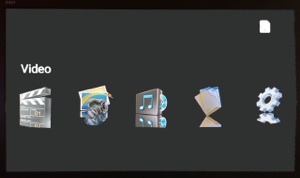
When you first switch on it will take 20sec to reset then display this first screen below.


Normal Playback
The first three folders are the players: In order to display video you must go into the Video folder (shown), to display still pictures you must go into the Photos folder, to play audio you must go into the Music folder (see red below).
Filing Folder -Rarely
All folders will show a list of files that it considers valid.
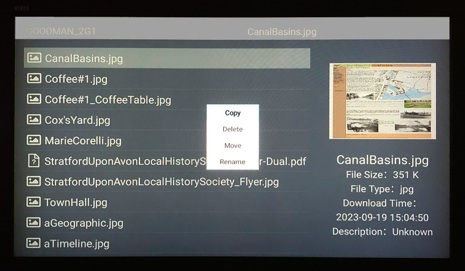
However this is the only folder where files can be modestly manipulated: “Copy, Delete, Move, Rename” (see red below).

Settings -Very Rarely
The only change that you may want to make here is to deselect auto playback of photos for instance if you have a presentation in front of an audience.
Don’t forget to put it back..
Photo Playback With Music
Obviously you must have music anywhere on the SD or memory stick. To select which music to play at the same time as playing your photos you MUST have a sequence playing.
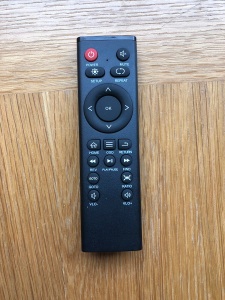
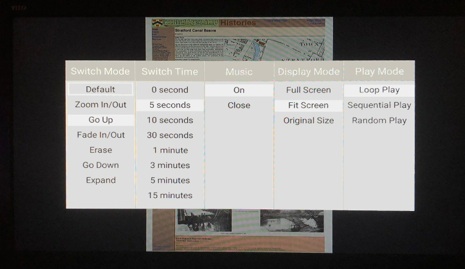
Then hit the Menu key (Button 2 above) and you will see the menu shown on (blue screen left). I’ve shown the settings that I prefer.
To select which music to play move the cursor to “On” (as shown) and press “OK” on the handset. The root folder will be shown again. Navigate to the music that you want then navigate to the right of that filename and hit “OK”. The alternative is “Cancel”. The music of your choice will now play every time that you play the photos from this folder -even if power is completely removed it will remember !


PHOTOS: Transitions Menu

Renaming Files
Because this is on a screen, not a keyboard, it works like most TVs. The trick is to toggle between layers with the “Return” and “OK” keys.
I’ll now take you through the logic..
-
Subtitle Formats:
-
-
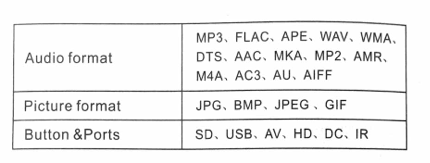
Photo format:
-
-
Audio format:
-
SMI, SSA, SRT, SUB
-
-
BMP, JPG, PNG, GIF (not TIFF)
-
-
MP3, WMA, OGG, AAC, FLAC, APE, AC3, ATRA

Copy or Move Files
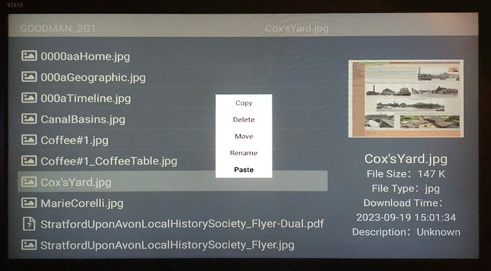
This can only be done in the Files menu but it is very easy. Navigate to the file that you want to copy/move and hit the Menu key (Button 2 above) and you will get the screen on the left here (red surround). Select which you want to do.
Now navigate to the folder where you want the file to go and again hit the Menu key. Now hit the “Paste” option as seen on the screen here (green surround).

The renaming system has three layers: 1. The name window (here showing “Cox’sYard.jpg” with the cursor at the end), 2L. The letters keyboard and 2N. The numbers keyboard.
When you first arrive at this function you are immediately put into layer 2L (as shown gold above). Thus you can navigate around and if you click “OK” that letter will be appended to the name in Layer 1. In common with all screen keyboards if you want to swap to the numbers keyboard then navigate to “?123” and press “OK” and you will see numbers and characters instead.
The First Thing To Do
However my guess is that when you first get here you don’t want add characters on the end -yet navigating only moves you around Layer 2 !
>>To move between layers use the Return key to logically go up a layer and “OK” to go down a layer.
So when you first arrive here you will most likely want to hit “Return” once to go to Layer 1, then shift left to where you want to make the changes in the filename and then hit “OK” to drop down to the keyboard layer again and select your choices (BTW The top right key is Delete).
When You’re Done: Exit
Now that you’ve inserted the correct characters (yes it is fiddly) hit “Return” to go to Layer 1. Then navigate to Rename’s “OK” button and select that to keep your changes and exit then you will see you new filename. If you want to discard your changes then obviously navigate to “Cancel”. The lower the characters in the filename the nearer the top of the file list your new filename will be put. This is your playing order. BTW Renaming happens to clear your Playback With Music selection.
FILE
When you go into the File system you can navigate around the folders. When you get to your files you can play them using “OK”. Usefully this is where “Menu” (Button 2 above) will work. It gives you the four options shown.
We’ll now look at each of these functions.