Respraying Meccano

In answer to the oft asked question: How do I respray old Meccano ? Here is some information that might help you become confident enough to make your parts look beautiful. It’s not difficult and the results are stunning. You just need to find the right place to do it and prepare a little.
AFFECTS TO MY HEALTH
Inevitably there will be fumes which may affect anyone with breathing problems, asthma etc. There are two occasions:
REMOVAL OF OLD PAINT
Now is the time to straighten any bends or kinks -you could run them back and forth through a plate bender/straightener. Of course it won’t matter if you damage the paint as it’s coming off next.
PAINTING
The choice of paints and efforts you take for a certain quality of finish will be as arduous as you make it.
Brush Painting When brush painting there are less fumes. Surfaces must be painted and dried when horizontal. Take massive care to put on as little as possible because it will run at the edges or may puddle. Any excess paint can cause Meccano holes to be undersized. Screws will go through but axles may struggle pushing the paint off defeating your efforts.
Spray Painting This requires a little more skill but I greatly prefer it. Coverage is greater for your money. The finish is beautiful and if again you put on as little as possible it will not run when hung vertically. It is almost dry within 15 seconds (less in a warm room) and touch dry in 2-3 minutes (very temperature dependent). If you haven't put on enough paint in some areas wait 10minutes and lightly put a little more on. Again use as very little as possible - this is the time most people cause runs. BTW Runs are not the end of the world with spray painting. They will show moderately on mid-range colours, bit not light colours or darks. This is because as the solvent evaporates the actual thickness of paint is very small so you don't get a ridge.
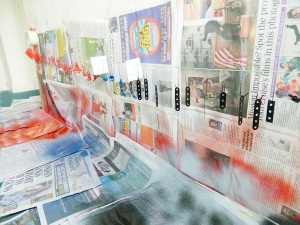
Fumes from solvent paints are voluminous. I actually quite like the smell (in small doses) but I suggest that your spraying is done where the fumes cannot travel throughout your house. I guess that this will mean outdoors. If outdoors the finish and spraying technique will be marred if there is any wind or raised humidity. When spraying even a light draught of wind causes you to compensate for the apparent drift of the cone of paint issuing from the spray nozzle causing you to find it very difficult to spray evenly. Have patience I have done this very successfully.
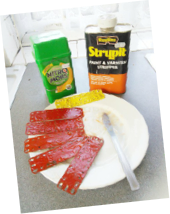
Stripping Proprietary paint stripper or caustic soda must be treated with respect -protect eyes and hands. Use old enamel plates with no cracks right through or plastic plant trays -see recommended articles below. Most paint strippers come as a goo which reduces likelihood of splashing. If using soda fill container to 5mm depth. Don’t use a wire brush as this can flick the chemicals all over the place -agitate gently with a steel tool. And don’t drop plates in from above -slowly slide them into the liquor sideways. Natural paint brushes will be dissolved by these solutions.
Efficiency If you are doing a large batch and want to be mean with the soda then strip the metal in several short goes rather than one big one with rinsing/scrubbing inbetween. This works because if any paint comes off easily then this is completely removed from the chemical process rather than it festering in the solution and using up the active ingredient. My guess is that the extra abrasion allows the chemical to attack the paint more acutely. Lastly, when it’s all over have those rather teaspoons at the ready. Any remnant chemical does wonders to tea-stains or ingrained food.
DANGER TO EYESIGHT AND SKIN Powdered Caustic Soda must be added to the small, correct volume of water -not the other way around otherwise it will boil over (exothermic reaction) and damage you and the work area. It will dissolve cotton towels but have old ones to hand. Wise preparation is a must. A strong solution is slightly more dilute than 1 part soda added to 2 parts of no more than lukewarm water by volume -it will heat itself too. Never do any of this with children under 18 about.
Fumes When Cleaning Those coming from the acid or cleaning fluids are very small in volume and not acidic (although some sputtering occurs when small bubbles burst) so you may choose to work in a room, with a window open. With two windows open use a fan, pointing out of one, to extract. Protect your eyes !
Fumes When Painting Brush paint gives off less fumes than spray painting. It may be possible indoors with extract. Spray painting needs better precautions see below.
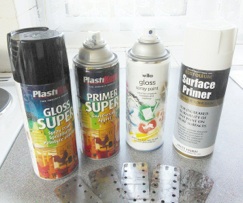
Priming I always use primer. Many websites say to dispense with the primer but then they say to put two coats of your prized top paint on ! Priming gives far superior adhesion to the final top layer. It often has a zinc component which inhibits rust. It eliminates the visibility of scratches. By removing these it reduces the surface area and for some reason means one uses far less top coat paint and, because of the reduced surface tension, it spreads far more evenly -even round corners. I've also found that top coat colours look far more vibrant if the correct primer/undercoat is used (be that white, grey or oxide red).

Choice Of Paint If you want a precise colour match then you need to do your research and there are websites out there advising. You also need to be aware, as artists are, that the type of light falling on pigments affects what our eyes see. Obviously experiment. When making a judgement do it in normal daylight -tungsten lighting and, even worse fluorescent lighting, will give false comparisons.
I have used many off the shelf hobby brands of paint to amazing success. These are attractively priced (roughly £6 per large tin), go on well and I’ve never ever had any peel off.
Prep Prepare your area and where to place your parts before and after painting. If they have them now is the time to mask off any brassware that joins to cranks, handles etc. Sadly the glue on domestic masking tape will dissolve with most solvents in metal paint so it lifts and allows thin paint to run under it which you’ll have to scrape off later. I therefore use strong cellotape wound closely around the boss.
DRYING
Follow the manufacturer’s instructions between coats and afterwards.
Drying After Brush Painting Many websites recommend baking afterwards. I have done this after spraying but it is extremely easy to literally overcook the paint slightly. The several samples that I tried ran, de-natured and ended up looking dreadful so I don’t. Many people do so I hope that you have better luck.
Drying After Spraying Between coats I normally leave 1/2 to 1 hour depending on the temperature. I can only say that I’ve only hand painted a little. The spray painting I’ve never done on really cold winter days - thus it’s been warm and acceptable to leave the parts to dry overnight. I’ve then put them on a window cill and left them in the sun the following day and have used them by the evening.
OTHER SOURCES OF INFORMATION
Do use Mr Google. The following sites are useful:
General Advice
I wrote an article for WLMS:
An article on SELMEC:
Alan Berman’s own website:
The very basics are covered on this RMG webpage: How To Restore Red-Green Parts -Howard Boder (other sites are far better -sorry guys)
Specialist Advice
As you’d expect there’s a whole tab of long webpages on NZ Meccano:
Good practical advice with lots of pictures:

Restoration (the very small font will need magnifying Cmd with +)
Repainting Zinc & Painted Plates To Blue & Gold Period Colors -Chris P
Rinsing After 8-10mins (in winter 10-15mins) transfer to a sink with a stainless steel fork. Wash any chemicals off the metal with running water. Wire wool is far more effective and being made of mild steel it won’t scratch your stainless steel sink very deeply. Don't worry about light scratching of your Meccano because you may choose to emery afterwards. I have successfully used stainless steel wool because it lasts longer but may damage your sink.
Lightly dry the metal with an old clean towel then by final drying to reduce immediate corrosion by leaving in the sun, a warm room or on a heater or boiled kettle. From now on mild steel will start to rust slowly. This is not a big problem but try not to leave unprotected steel for more than an hour or so. Ensure no contact with anything oily before painting.
Cleaning Up Don’t leave the used solution lying around: Sod’s Law says accidents will happen ! And the now thicker liquid will start to unload its paint onto your containers -using up chemical next time.
Buffing Rusty parts may need to be abraded with emery cloth -which is far more flexible for getting round corners. You may need to start coarse then finish with 800 grit.
Disclaimer
Whilst some care has been taken to check externally linked websites no responsibility is offered nor implied for the suitability, legality or reliability of content therein.