Make An Unreal Aquarium


Aerial Support
Disclaimer
Whilst some care has been taken to check externally linked websites no responsibility is offered nor implied for the suitability, legality or reliability of content therein.
Unfloating
Your sealife is made from silicone which, as I said, is heavier than water. Yet it is sold because it does float in a normal aquarium. How ? Because it has floats in it ! Literally all artificial (and real !) aquarium sealife has air bubbles in. The artificial fish have a nylon ovate capsule and the jelly fish are cast with a modest cylindrical void in the middle (real fish have a ‘swim bladder’). This is why they float but their danglies dangle. As there’s no water we need to support these from above..
Wall Batons
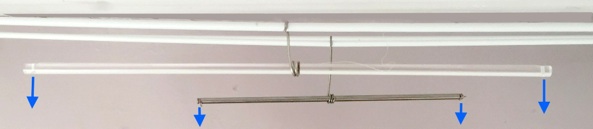
You will want to arrange your sealife artistically so the supports must be adjustable. I decided to stretch curtain cord between two 400mm batons.
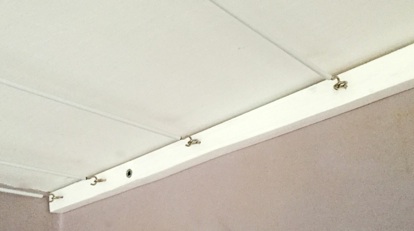
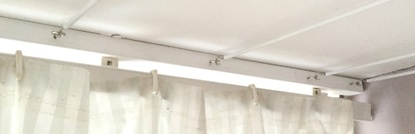
One (C) was screwed merely up into the top right hand corner. The other (D) on the left hand side I decided to conceal. I took the shower curtain down (to avoid its weight on the curtain rail) and removed the screws that held the rail to the ceiling -most went into the beams above. I measured where the holes were and made holes in my new baton. Then, using longer screws, I refixed the curtain rail sandwiching my new baton between the rail and the ceiling. It adds hardly any slope to the curtain rail but is almost unnoticeable.
Cords
Curtain cord, with hooks and eyes, can be purchased in 10m lengths very cheaply. The support batons were 1.5m apart. However I cut five lengths of curtain cord 25mm short. I screwed in the hooks. I fitted the eyes to the batons 100mm apart but the first one was 30mm from the wall. I stretched the cords over the eyes. This gave the right amount of tension in them without the cumulative tension being a risk of pulling the batons off the walls.
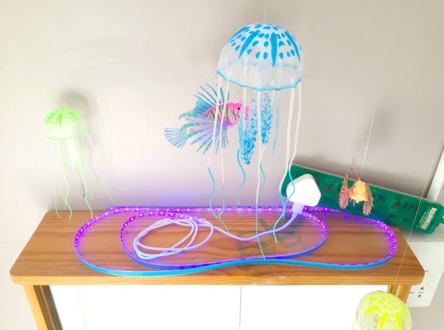
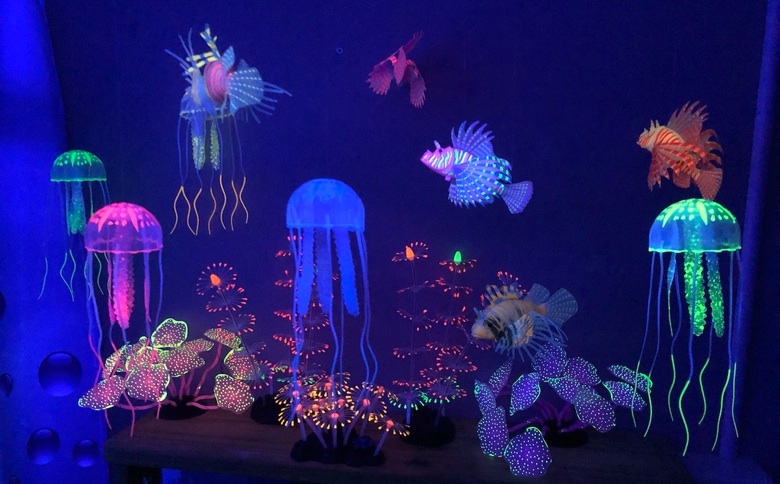
Ever since I saw the Avatar movie I’ve wanted an aquarium with beautiful tropical fish wending their way round beautiful plants and sunken shipwrecks with undiscovered treasure spilt carelessly.
However whatever fish and plants would need feeding and regular care, ‘mucking out’ etc.
Add to that that I also travel away from home often and, I admit, I want the benefits without the work so I decided to try to make one with all the beauty modernity manages to convey. This has turned out to be not such a tall order these days but in its reality quite unreal..
This page is divided into the following sections: What You’ll Need, Aerial Support, Plants - Up From Below, Knots, UV Light & Purchasing.
Before starting please read UV Light section at the very end..
What You’ll Need
A Sensible Place To Put It
This may seem obvious however I’d suggest that you don’t put it where small children will pull it to pieces. You will want a place where it can be admired but left without being in the way -ever. The supports above need to be able to carry the weight of many silicone fish etc which I discovered are not particularly light weight (yes silicone is heavier than water -more about this later). At first I felt that a portable version seemed like a good idea until I realised I’d have to store this necessarily large portable idea ! I plumbed (ha ha) for the bathroom.
Sealife
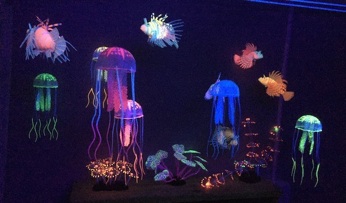
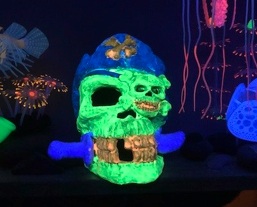
Yes many, many street and online shops sell artificial sea-life normally made from silicone - the same material as bathroom sealant. However not all sell flora or fauna that glow in UV light. Therefore always make sure. That word ‘glow’ must be in the description.
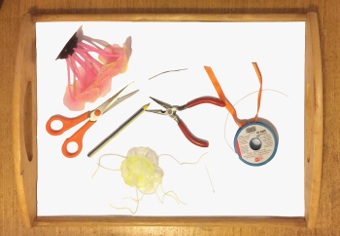
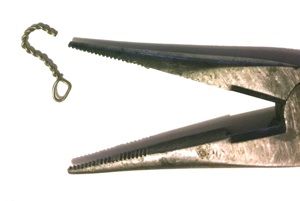
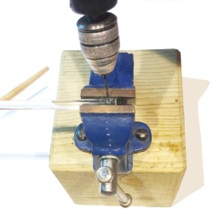
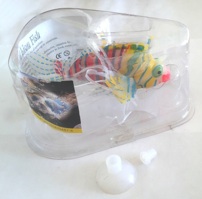
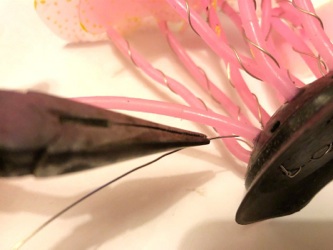
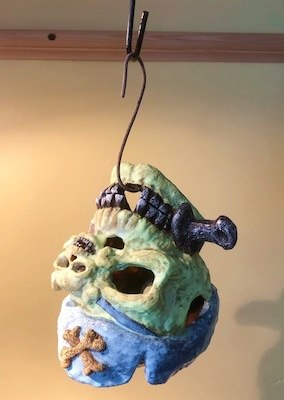
If you buy your sealife from a reputable company they should come in a clear plastic protection box. Take care as the silicone is very easily torn. To teather them to a fish tank they have a suction cup this is easily removed by simply gently pulling its little plug out (A).
Yes, certainly buy fish and sea plants but search out the rarer jelly-fish -they are the real kings of the unreal world !

Support Line
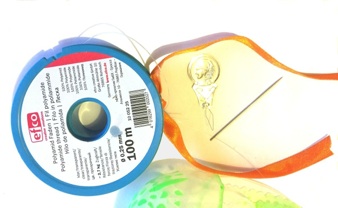
I used the fishing line that came with the creatures. Be warned it is very thin (0.1mm is less than human hair thickness). I did need more from time to time so had purchased some 0.25mm line again very cheaply. This has 2.5kg breaking strain which is oodles over capacity.
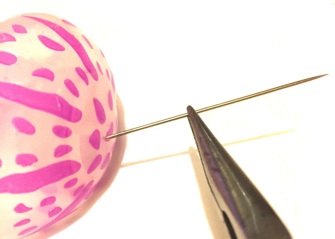
As I’ve already said seeing and manipulating such thin line can be a bit of a game. To ease threading the needle you might want to use one of those Chinese needle threaders (E).
Supports From Above
If you are thinking of a high corner in a room: no it is not wise to buy hooks and screw directly into a plasterboard ceiling. It is not designed for this and you will permanently mar its beautiful smoothness or even crumble it so much that you will have to get a plasterer in ! (this is dealt with in more detail below).
UV Light
This has the possibility of stopping your whole project in its tracks. Goto to UV Light section at the very end.
Tools
These depend on how you achieve your goal. I’d suggest that you will need access to a modest number of basic DIY tools and consumables like timber, screws, nails, hooks, paint, brushes, pliers, scissors and 0.25mm fishing line. I worked on a white tray (B) so as to be able to see the crystal clear fishing line.
You will also need a long dress-makers needle.
Hooks
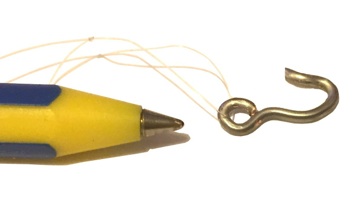
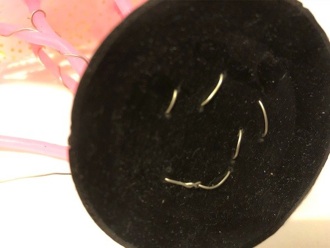
I decided not to permanently tie any item in one place so used tiny homemade hooks which allow any item to be hung anywhere easily.
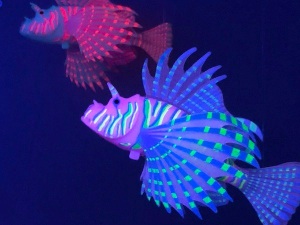
Whilst the jellyfish were really light (8g) and some fish were just a little more (13g) most fish were nearly three times that (33g). Therefore I decided to make light duty hooks by simply twining thin electrical hook-up wire on itself with a loop at one end (H).
However the heavier fish and other items required a gauge of copper wire that was much more rigid once put into shape (I).
Attach the fishing line with a slip knot (see below) through the loop.
Balancing Bars
It’s all very well suspending everything in as imaginative way as possible. However I felt that a little movement would imply a certain amount of life in each sea creature. To achieve this I made balancing bars (J).
I got some 3mm steel rod, flattened the end in a vice (this could also be done by placing between two pieces of metal and hitting one hard with a hammer). A disposable bamboo chopstick or skewer may work but I felt these would bend over time. Ideally these should be ~150mm long and certainly not longer than 200mm.
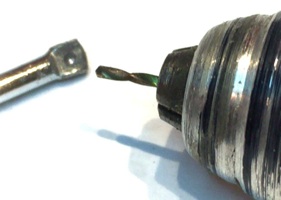
I drilled a 1mm hole in each end (K) which would easily accommodate the 0.25mm fishing line and any knot that happens to need to pass through.
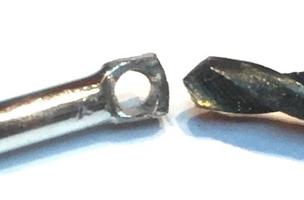
After you’ve drilled you will notice the inevitable burr that will be around the hole. Obviously this is sharp and will cut through the fishing line in time. By hand I used a larger drill to just cut this away to leave a smooth chamfer (L).
Later on I discovered that I’d got some 5mm clear Perspex rod so I drilled that accordingly. I knew this from years back but you may not be aware: so see warning below.
Pass the line from each item through each end and tie with a reef knot. It MUST be a reef knot (see below).
Granted they will just turn in a circle but if enough of them do it our brains don’t concentrate on any one motion so see everything moving at once. Everything is so light that it only takes the draft from a door opening to give each a little push to set all of them in gentle motion.
F
G
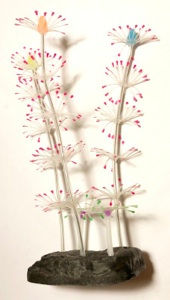
Plants, as we all know, are fixed at the bottom and grow upwards so the silicone versions that are put in fishtanks are weighted at the bottom but contain the usual floats. These latter need to be disguised. Therefore the stalks are often hollow tubes and the flower head will contain an air sack. Out in the air they obviously flop right down. To solve this I opted for simplicity..
Plants With Tubes
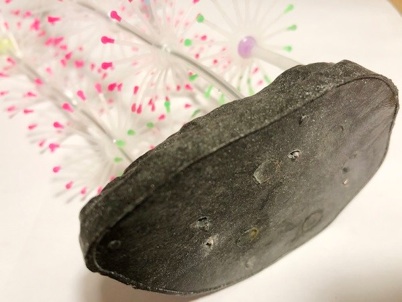
One brand of tall plant indeed has stalks made up of hollow tubes with the concentric fronds glued to them at intervals (N). The colourd flower heads are actually air tanks ! The stalks pull out easily and one can drill a 1.5mm hole in the base from the top. Note that because they have to resist the pull up of each fond the base has to be made of much heavier plastic to keep it on the bottom of the tank - so keep drilling this is just denser plastic !
I passed a thick 0.6mm piece of tinned copper wire through the hole up from below. I threaded the tube onto this and slid it down. I then pushed the wire nearly to the top and snipped off the excess the wire (O). I then super-glued it back in place (Careful not to glue your fingers !)
WARNING IF DRILLING PERSPEX
Drilling any material, especially when using a blunt drill bit, produces heat. Perspex is an extremely good insulator so any heat produced cannot get away. As swarfe is produced in this material it is soft and sticky between the hole and the drill bit. This causes friction. In fact the swarfe rolls into sausages which continually roll round and round the inner surface of the hole dragging the drill bit.
Perspex also expands considerably with heat. The material cannot expand outwards so it expands inwards, gripping the drill more, and causing even more heat. If your drill speed is high (which is normal for small drills into steel) a chain reaction occurs causing the plastic to quickly melt thus adhering to the drill bit even more ! Normally the drill will stall and the mess cools down -solid. Most likely you consider drilling your way out of this by putting more power on. But no -you snap the drill off -right where you don’t want a bit of hardened high speed steel melted in tight.
THE SOLUTION
Obviously keep your drill speed low. However the sausages can still get you -therefore, as you drill, pull the entire drill bit out of the hole. Remove the build up of swarfe, which causes friction, and let the drill bit cool down a little. Again keep it slow ! You’ll be through soon enough because it is so soft.
Getting Knoted
You will need to know how to tie only two types of knot. I suggest that you use slip knots when tying to hooks and reef knots when jointing two lines together. IF YOU TIE A ‘GRANNY’ THEN SLIDE IT OFF AND START AGAIN - WITH FISHING LINE IT WILL ALWAYS SLIP !
If you weren’t one of Baden-Powell’s Boy Scouts or Girl Guides you may need to know how. However I will leave professionals to show you:
Because it’s so fiddly when tying a reef knot ensure one fish is hard to your left and one hard to the right ie neither immediately in front of you, so that there is roughly 100-150mm overlap. This ensures that the lines come from opposite directions and enables you to cross the two halves of the knot over, easily with a bit of tension, when tying it. it’s very boring if you hang anything up and it just falls to the floor so give it a gentle tug when you think you’re done.
UV Light
Care Needed
As I said at the beginning your ability to provide adequate UV lighting safely is the deal breaker. If you haven’t planned this properly then all your effort will be wasted. I don’t think that I need to warn you of this..
WARNING
This installation requires electrical power. If you choose a kitchen or bathroom then
There are serious dangers when water and electricity are near each other
UV LEDs
In order to avoid having to mess with mains power I tried a UV LED chain (see right). Some versions conveniently come with a USB connector which can be easily extended outside of the room. This carries a mere 5v so is perfectly safe anywhere with any age group. They are very reasonably priced and could be mounted on the top of a horizontal surface facing upwards -although take care because the LED tape cannot be bent much horizontally when flat. Unfortunately I found two issues with UV LEDs:
-
i)UV LED chains have quite poor UV output;
-
ii)They emit a fair proportion of general light -mainly blue (they look rather purple on this camera). Whilst in itself this isn’t the end of the world to me it did seem to distract from the stupefying sight of seeing the sea life actually being the only source of light themselves in the room and nothing else.
If you are just dabbling with the idea then I suggest that this is the route to choose. I went a bit further..
Patience
Last but not least you know that Rome wasn’t built in a day and nor will your aquarium - just like the real thing ! In fact you need to aim to plan and execute this over many small sessions. It all needs patience so if you are unwell or tired forget it. Go read a book or ring Aunty Halibut (an aquarium joke, sorry). Truly you will be so frustrated when doing so many fiddly jobs that require a steady hand. Decide on just a couple of hours and have a break. Then come back another time and do some more.
Let’s get on with the job...
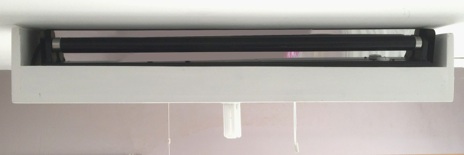
Black Light
In a former life I was a DJ with a large rig. I own several ‘black lights’. These have a simple 600mm UV fluorescent tube with rating of only 20W. However mine has mirror that doubles the UV thrown forward. These have superior performance with very little visible light.
WARNING
UV light is in sunshine. Most wall paint does not reflect UV well so having it in a room is not
such a problem. However it is not best to peer too long closely at it
Do not look directly at any UV light source for a prolonged period
The only problem is that these tubes require mains power. For 8 years I ran a building business and am a qualified electrician. For safety reasons I therefore put mine in a box. I located the beam in the loft which was conveniently near where the cable came through. I screwed a 60mm coach bolt into it being careful to choose exactly the centre line of the beam (you can see this by the normal light).
Power
Obviously the mains power was already there and controlled by the usual pull-cord. However on the far side of the box you will see another pull-cord. This is of the 2-way changeover variety so that either the normal main light can be used or the black light. The pull-cord works perfectly well if mounted on its side.
So far the whole thing has worked faultlessly.
WARNING
Obviously mains power is dangerous
All mains wiring must be made by a Qualified Electrician

Front view showing the DJ tube with integral mirror behind.
E
A
B
Threading Your Creatures
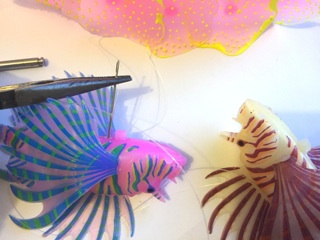
There’s no need to remove the line that each sea creature comes with. Firstly ascertain where the top fins have to be supported to give each fish level balance -they do vary a bit.
As I said each creature contains a bubble. The fish had to be drilled with a 1.5mm drill top and bottom. It really doesn’t matter where the bottom hole is so drill at one end of the lug where the existing line attaches. Then thread the fishing line through with a long dress-maker’s needle (F).
The jelly fish are simpler. Thread the needle and merely push it through from near the bottom lug to come out of the top exactly in the middle (G). Very little force is requird. You’ll notice that the hollow compartment is cast in two halves.
H
I
J
K
L
M
C
D
Knots
None of the pictures on this page have been photographically enhanced in any way - they are literally how they came out of my mobile phone’s camera.
They have merely been cropped and compressed in order to cut the total data on the page down.
N


O
Plants - Up From Below
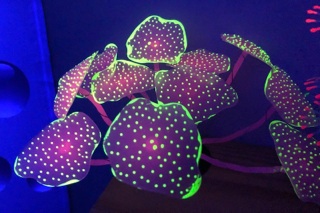
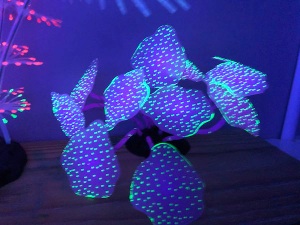
Plants Without Tubes
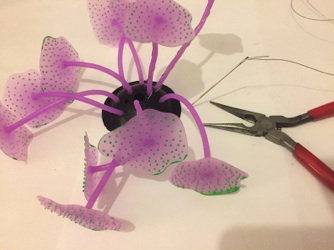
You will no doubt encounter plants that are simple silicone castings with microscopic air bubbles in to make them float. Again I needed to make these look as if they are floating upwards naturally. As the whole area will be dark I decided that by wrapping thin tinned copper wire around these stalks they will look like a spiral vein.
The base of these was supple jelly plastic therefore (similar to G above) I threaded the wire through the eye of a needle and thence through the base (Can you see the wire in P below ? - Not really ? ..good ). The wire is very easily pulled back out again so I made each ‘vein’ a U-shaped loop (Q). In order for the base to sit flat the wire must be pulled flush with the bottom surface (R). One then winds the wire around. There’s a knack to this: Trim off 20mm more wire than you need. Hold the wire against the stalk between thumb and forefinger with one hand and spiral wrap the wire around with the other hand - moving your thumb and forefinger further up, gripping, as you go. At the top wrap the wire into a closed loop so that the leaf doesn’t fall out. You should have just the right amount of wire to do this.
Of course there’s alway a catch. I found that there were an odd number of leaves so notice (Q) that I tied off one ‘vein’ to the looped turn of another to prevent it from being pulled out.
P
Q
R
Beware: Silicone tears very easily - treat these stalks gently.
I’m strongly averse to recommending one supplier over another. However for your expediency I’ll make an exception and list those that I used. I make no guarantee of suitability for your project..
-
Tropical Decorations
-
Glowing Effect Aquarium Décor Small Silicone Artificial Jellyfish & Coral Plant Kit
-
-
Glowing Effect Artificial Aquarium Lionfish Ornament - 5 Pieces
-
-
Glowing Artificial Coral Ornament Aquarium Decoration - 1 Piece
-
-
-
Supports
-
Net Curtain Wire, Hanging Cord Kit with 10 Pairs of Hooks and Eyes -10 meter
-
-
-
-
Shower Curtain
S
T
U
It’s Time To Take A Break

It’s Time To Take A Break
It’s Time To Take A Break
It’s Time To Take A Break
It’s Time To Take A Break
Purchasing

matt’s shed
mens shed
shed projects
shed ideas
-
1)Firstly they vary hugely in brightness which is rather disappointing and, I’m guessing, that the brightness also varies between suppliers. Therefore you have to offer your chosen powders up to your chosen UV source (which we’ve already seen above varies between types of source) and plan what colour you are going to use where.
-
2)Secondly they are a powder. This means that they have to be dissolved in a carrying medium. This carrying medium will block some of the UV reaching the powder and some of the light emanating from it so that’s a double whammy. I used PVA glue which dries clear but still lost some of the light. You could use varnish but that can be very runny.
-
3)Lastly for those using PVA some colours massively speed up the glue’s catalysing time ie it dries so rapidly that you barely have time to mix it let alone apply it. Yes I did dilute the PVA with water even to a runny consistency and that made no difference. The red/orange was bad and the purple colour impossible (this has come out bright blue on my camera in W).
Using Fluorescent Paints
The solution to the last problem lies in simple chemistry. All chemical reactions double in speed for every 10ºC rise in temperature. Therefore I put a drinking glass in the freezer for 15min which took it down to -20ºC. I used a large glass and small amount of mix so as to prolong the cold for as long as possible. This still only gave approximately 1 minute of liquid time ! Therefore I applied this in small phases.
Using PVA is also handy because it sets fairly quickly. Inbetween colours have a hook ready to receive your work while it dries (V).
V
W
Not Straightforward
You would think that using fluorescent paint powders would be straightforward. I found them a very mixed bag which is why I’ve put this as an addendum to the main article here. There are three problems:
