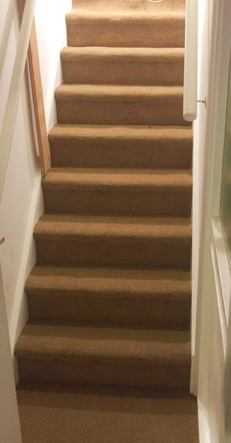
Fitting A Stair Carpet
What YouTubers Fail To Tell You..


Fitting A Stair Carpet
What YouTubers Fail To Tell You..
Disclaimers
* I have no connection nor incentive with the companies asterisked above.
Whilst some care has been taken to check externally linked websites no responsibility is offered nor implied for the suitability, legality or reliability of content therein.
Not Another Advice Page - Why ?
You’ve bought your carpet and carpet grippers and you want to get on with the job so just quickly read on..
Useful jobs a couple of days ahead:
STAIRCASE PREPARATIONS
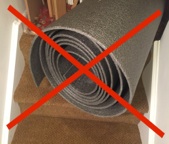
1.Remove all the old carpet and discard
You may want to keep the good bits to loose lay in the loft for insulation and, if you have flooring down, to prevent you scuffing your knees and help boxes slide around.
2.Remove All Old Tacks
Keep them for later because it’s environmentally friendly.
3.Sand All Woodwork -Particularly The Parts Above The Carpet
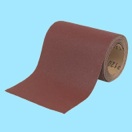
Rolls of 40G sandpaper x5m are available (approx £6 from your fav fixing of screws building supplier*).
4.Prime And Paint Two Coats Of Final Colour On Woodwork
Therefore you won’t need to decorate for several years - with the risk of overpainting onto your new carpet. And later painting will not look as good. You must allow all this paint to fully dry because when you lay the carpet it’s recently cut edges are really sharp and will scrape your new paint off. Therefore allow at least 24h even with quick drying paint.
If you’ve not used Zinsser Primer* then I unashamedly recommend it because it is meths based and will seep deeply into the woodwork, it dries quickly and has an incredibly large coverage and you can add mere meths if you leave to lid off for long periods. Despite fairly high initial cost (£18/L from your fav fixing of screws building supplier*) I used it a lot and it will last a long time. I always use Dulux for final coat because it doesn’t run and is a very durable finish which is vital in places likely to get kicked. I have no connection with this company either.
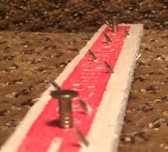
5.Buy Carpet Grippers
Measure how much you need and discern what lengths they’re supplied in and add 10%. The grippers do not need to go exactly the full width of the stairs but you don’t want to run out - especially in a house that is in use. They all come with nails part way inserted conveniently ready to bang down. Be aware that little short lengths are not very effective when joined together and remnant pieces may not have nails in as they are quite far apart (every 130mm on mine -which seems average). Shop around as prices vary hugely yet they are all basically the same simple bit of plain plywood !

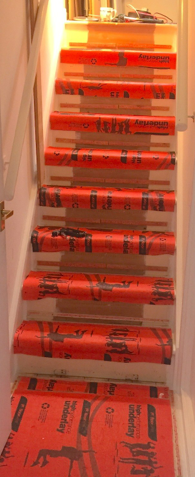
FITTING UNDERLAY TO THE STAIRS
1.Only fit the underlay on the day otherwise it may get damaged. I know it’s obvious but don’t have people using the stairs at this time - especially children. If you only have an upstairs toilet - water everyone first !
2.Cut underlay (shown green on right) 10mm less wide than the stairs and deep enough to butt up to the horizontal gripper (shown red) on the tread and hang over the nose. Try one at first and copy that to make the rest. To estimate the roll over the edge and where to fix below isn’t easy and may vary a little with each one you fit. However it’s far quicker to not be pedantic about this because the riser will never carry a load so leave a generous gap. You will save expensive underlay and it really doesn’t matter.
3.Starting at the top step with a hand-stapler bang 6-8 12mm staples across the tread. My underlay was 9mm thick and they sank ~4mm into the wood.
4.Starting at one side carefully wrap the underlay around and under the nose and staple 6-8 more across the whole riser to the other side. The staples on the top can be at any angle, just bash them in, but the lower staples need to be roughly horizontal to push the underlay right under the nose. If you have used cheap underlay it will tear at this point -(sorry but I did say). A powered nailgun is OTT for this.
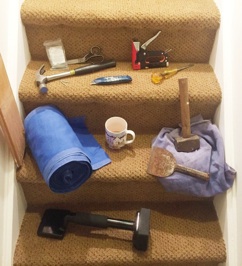
GATHER TOOLS
You will need
1.Tape measure
2.A builders square and long straight edge for marking out new carpet perfectly. Metal is ideal as it doesn’t get cut by the knife. I used a piece of stiff wood 1000 x 25 x 8mm.
3.Permanent Marker Pens.
4.Knife with a new blade and strong scissors to cut the straggly bits and short cuts around small obstacles.
5.Staple gun with 12mm staples.
6.Flat blade screwdriver to extract misplaced staples.
7.Hammer and 40mm wire nails. These sound excessively long but they need to be pushed through the carpet, the underlay and through any small gap into the wood. They will be used on the stair risers only but initially the carpet may be hanging a little loosely round the nose of the step leaving an additional space that you will close in a moment’s time. Friction on the nails through the carpet at one end, and touching the wood at the other, you hold the carpet before you bang them in. Any shorter and they are difficult to line up and impossible to hold. My wood was old and therefore hard. They needed very hard hammering in but my fingers were nowhere near. You can tell I was a H&S Officer !
8.A broad electrician’s bolster chisel and club hammer (mine weighed 1.5kg) to absolutely belt the carpet into the groove between the carpet grippers at the back of each step.
9.A piece of coarse woven protective cloth (mine was an old apron) so that the bolster doesn’t cut the carpet as you hammer it in the groove.
10.A long roll of cloth. This will be rolled up with the carpet before laying. It is used to control the unwinding of the new carpet. A bath towel is not long enough.
11.Tea. Yes it’s vital. This is going to be hard physical work. To concentrate you need to take breaks and re-hydrate.
OTHER TOOLS
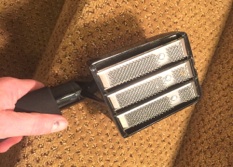
Carpet Layer’s Knee Hammer
This has a hard rubber pad at one end and angled spikes, on one or more ‘combs’, at the other. Normally there are three combs. You place the combs down, near to a carpet edge that needs coaxing, even stretching, in a certain direction normally towards a gap along an edge. Hit the pad hard with your knee and the carpet should shift slightly in that direction but not slide back IF you have put the carpet grippers the right way round. As the comb points are angled the whole device will easily lift away from the carpet edge.
You do not need one with adjustable spikes nor adjustable length of handle. These are just stupid gimmicks. Buy one that has three combs. These are all the same so the most reasonably priced is completely adequate even if you are a professional.
You do not actually need this tool to lay a stair carpet. However I have one and it was useful, but not essential, a couple of times.
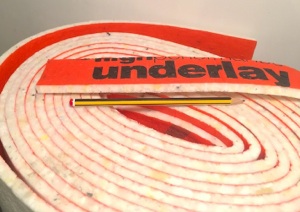
Underlay
Underlay significantly increases the life of your carpet by cushioning it when it’s hit by footwear especially on stairs. The effect also feels more luxurious. It keeps a house warm from conduction losses downwards and absorbs sound so your house doesn’t suffer so much din when walked upon - especially when coming down stairs.
I used 9mm recycled polyurethane foam material (PU) claimed to be made to British Standards (Floorwise Bravura) at £45/15m². This is expensive but for stairs I don’t want to repeat the job again in just a couple of years. Do not use cheap expanded plastic (see right) because on stairs it will flatten easily and remain that way thereby becoming completely pointless and very flammable. It’s a waste of money and worse will not prolong the life of your new pride and joy. It’s OK in large rooms.
To prolong life against abrasion by the carpet above all underlay must be fitted with the writing side up.
CONSUMABLES
Grippers
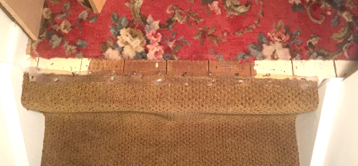
They are nailed to large areas of wooden flooring. Leaving a 20mm gap to any edge eg skirting or first stair riser. Some websites say 15mm or even a half inch (12mm) but stairs are different. These latter two distances are far too small for stairs (see later). You will need two grippers per step. Gripper points (see right) must face outwards from the centre of a room. On stairs they must face towards the back of a tread and downwards on a riser. The gap must be at least 20mm for normal carpet or 25mm in each direction for very think carpet. You will need a large stock of grippers so don’t be mean. They often come in 1.2m lengths. Shop around for these as prices vary hugely yet they all do the same basic job. I found cheap ones worked perfectly well.
5.Fit the remainder of the identical underlay pieces. If you started at the bottom then as you worked up, you twisted your feet as you turned from stair edge to stair edge with the stapler, you will very likely have torn the underlay with your feet. Likewise if you used cheap underlay you will have torn and squashed it a lot as you twisted. It will have lost a lot of its bounce. So rip the useless underlay up, pull out the wasted staples and get your credit card out to fill up your car fuel tank and pay for proper underlay (sorry but I did say). The whole job is now held up. Goto back to Step one, Do not pass Go, Do not collect a cup of tea.
Underlay is fitted and no people are walking around your work area. You think it’s time to crack on.. However take your time on the next stage..
1.Clear a fairly large work area in a nearby room as you will not be able to complete the next stages in a confined space.
2.Ascertain whether your carpet has a nap -that is a direction that the pile naturally lies in. Modern, reasonably priced, carpets don’t. If it does, and it will be obvious, then you will need to lay the carpet so that the tufts point down the stairs; that is away from the risers. This is because as people propel themselves up stairs they push back and may indeed slip just a little. You want that push/slip to brush the tufts in their natural direction. Otherwise the tufts will be forced to not lie down in their happy, ordered way. They will mat and then get crunched and fibres will break off. The carpet will wear out prematurely. You are now master of your carpet’s destiny..
3.Accurately measure top and bottom of staircase to millimeter accuracy. In the main staircases are pre-made before the house is built. Hence the name “stair case” or casement which means to be in a frame. They are properly square and the sides will be parallel.
4.Put some of your old carpet upside-down on the floor where your are going to cut.
5.In your spacious area take you new carpet and ascertain whether one edge is truly straight and whether that straight edge is square to the pattern if any. My carpet was cut from offcuts which were very wobbly. If this is the case then turn your new carpet upside-down and cut yourself a new, accurately straight, “true edge”. If it’s not true it will show on this edge and the opposite one will follow also.
6.With a thin permanent ink fibre pen, on the underside of your new carpet, mark your accurately measured width, from your true edge, with a dash every 300-400mm.
7.Stop. Go back and measure the stairs again and compare with your dashes. It’s very easy to have measured something wrong. This is a vital last check !
8.If you’re correct select a fairly long, fairly thin straight edge to join up your dashes. I used a piece of timber 1000 x 25 x 8mm.
9.With a knife, that has a brand new blade, cut the carpet. This is renowned not easy. I found the best way was to lean on all fours with my arm outstretched, and draw the knife slowly towards me by bending the elbow. You will obviously have to press hard. After a few hesitant starts I cut decisively, most of the way through. There’s no point in cutting part way through then cutting again because you may wobble and not cut along the same line thereby making a mess. I did cut along the straight edge when I first started but obviously the knife occasionally cut into the wood and I had to stop. Practice by cutting 100mm strips from your old carpet if you need to gain confidence.
10.Cut the end perfectly square. I used a builders square. If you don’t have one use a sheet of newspaper to mark dashes then join them up with your trusty straight edge. This edge will have to be placed at the base of the stairs or any join part way up. You you will have to have a join somewhere because most carpets aren’t long enough to lay a staircase in one piece. And besides you really won’t know how much you are going to need because the wrap around the nose is a incalculable quantity.
So the woodwork is double painted and grippers down. Start refreshed as this may take more hours than you hoped. Time to crack on..
Redecoration done, underlay is fitted and carpet cut. Finally you will see a result that you’ll be proud of..
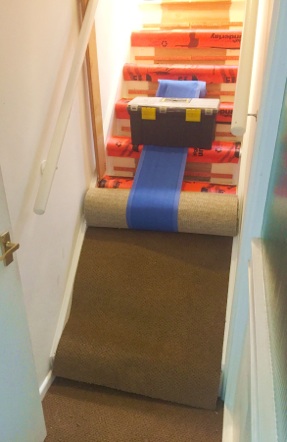
1.My favourite carpet shop cut the stair carpet into three strips. I have no hesitation in highly recommending Phil Ashby proprietor of Alcester Carpet.co.uk* who supplied and for free willingly cut and delivered my carpets for hall, stairs and small bedroom. In a nearby room I unrolled the carpet and then re-rolled it trapping a long length of some old cloth leaving a generous tail hanging out of the end. If your carpet has a nap or particular pattern then ensure that you roll in the correct direction.
2.I suggest that you lay from the bottom of the stairs upwards.
3.With 1 - 1.5m of carpet exposed I placed the carpet roll at least one third of the way up the stairs and trapped the cloth tail under a toolkit to stop it rolling on top of me.
4.Dress the carpet so that it is accurately squarely coming down the stairs. If you don’t it will you will have to steer it back on track. This will cause bulges all over the place which will look and feel awful underfoot.
5.Draw the bottom edge so that it just meets the floor and press it against the gripper on the first riser. I had actually laid the floor section in the stairwell first and left a gap, the thickness of the carpet, between it and the first riser. This now filled that gap.
6.Get hammer, nails, electrician’s bolster, protective coarse cloth & club hammer.
7.The next part is tricky but it gets easier. With one’s foot holding the bottom edge against that first gripper punch the carpet onto the first tread with your fist. Work it into the step. Ensure that the carpet all the way up the stairs is still square. Flatten it down but avoid fully engaging it with the first horizontal gripper on that first tread.
8.Mould the carpet round the first nose. Spread the carpet across that first riser (just above the floor). It may pull a bit more round the nose. Mould it back correctly round the first nose. I cheated now and used the staple gun to tack the carpet under the nose in two places roughly one third and two thirds across the stair width. If the area is warm, like a recently captured bull, the carpet will start to relax. Re-check the tightness around the nose and the vital squareness.
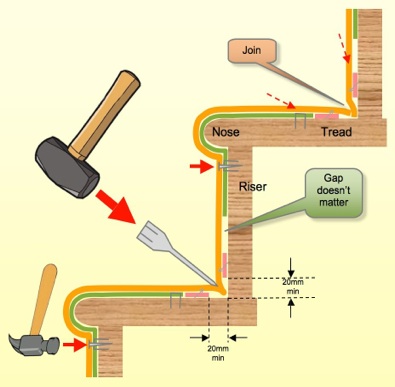
9.Starting in the middle hammer 7-8 nails right under the nose to hold the carpet exactly in place. Hammer them in so far that they can nolonger be seen (see red arrows in diagram above).
10.Flatten the carpet across the first tread. It should be even without bulges. Engage it with that tread’s gripper -don’t worry if it touches the next gripper, on the second riser, because the hooks will face down allowing more carpet, from stock. to come down as needed.
11.Place the coarse cloth over the brick chisel and with the club hammer bash the carpet into the gap at the back of the tread made by the two grippers facing each other (see the large red arrow in the diagram above). Start more horizontally at first. Work it in deeply. You will get a nice square corner but the carpet cannot spring back out because of the facing direction of the two grippers’ hooks. The beast is in but it can’t get out. Get a cup of tea.
12.Continue fitting like this up the stairs. It will get easier if you have cut the width accurately and it is set square.
13.Eventually you will run out of carpet so cut it back and flatten it (see dotted arrows in diagram above) so that you just have a nice gap to slot the next piece behind just like you did at the bottom of the stairs (see “Join” in the diagram above).
14.You will reach the top of the stairs. But you will be tired by now. I hope that it’s not late ? You deserve a rest and a meal. Due to other commitments I stopped for several days. However a roll of carpet half fixed down is a serious hazard so before you fully stop cut off the carpet so that it just tucks away. The landing carpet is going to have a side tongue that hangs over the top nose (quite a contortion !) to the top step. I had plenty of spare carpet so fixed a sheet of strong plastic sheet across the top edge of the landing (right) to prevent any likelihood of a trip that would break someone’s neck ! Accidents on stairs can kill.
14.Going back to the stairwell, in the doorway between your new carpet and the adjacent room, there’s no excuse not to have a neat interface because you cut it square before you laid it. With fine (100G) sandpaper shine up your aluminium door plate and screw back in the doorway (last photo).
15.Stop and rest. Well done. Admire your work-person-ship.
DO NOT LEAVE A TRIP HAZARD
DO NOT LEAVE A TRIP HAZARD
Specifications for underlay are bonkers. So many companies say that they meet or exceed British Standards but they don’t say which ones. The odd ones that do quote BS5808. However that was withdrawn in 2004 ! It is replaced by BS EN14499. However even that has a broad range of complicity when it comes to fire retardant properties so frankly just don’t let your house catch fire. I assume all of them burn which is a poor show. Whatever you do never use expanded polystyrene underlay because it catches very easily and burns like hell emitting a thick acrid carcinogenic smoke. It cannot be recycled like PU and should have been banned from use as a packing material 40 years ago.
TOP
BOTTOM
The least worst general advice I could find was by CarpetRight* but even they don’t mention the dreaded fire problem. See Types Of Underlay. If you know better please email me on address given here: Home.
STARTING
FINISHED

Days Before You Actually Lay The Carpet
On The Day Underlay Preparation
On The Day Carpet Preparation
Carpet Laying - Finally !
Yes you can rise to the challenge !
matt’s shed
mens shed
shed projects
shed ideas
