Indoor Washing Dryers

Disclaimer
Whilst some care has been taken to check externally linked websites no responsibility is offered nor implied for the suitability, legality or reliability of content therein.
Rail Is the Way

Dry Subject
Living in such a green and pleasant land the UK has it’s periods of rain yet if you want to get on with your life and not pay a fortune for drying your clothes what do you do ?
I suggest that you put up a simple yet attractive set of hanging rails. And simple it can be requiring just a bit of recycling..
I hope this has whet your appetite for solving a dry problem !

Recycled Cycling
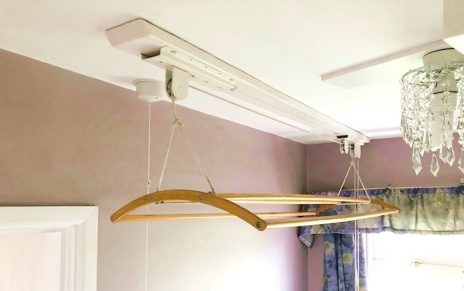
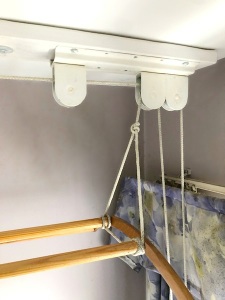
The idea of hanging washing up near the ceiling isn’t just to get it out of the way. We all know that warm air rises so that the warmest part of a room is higher up and in that area the convecting air will be traveling at its highest speed so drying will be most efficient there. Therefore I installed a pulley system to lift my damp washing up there. This looks complicated but is merely a push-bike suspension system for a garage. These are quite cheap in local discount stores or online. Annoyingly they normally come in black so I have been careful in my respraying the two halves white. Notice that one of the pulleys is not used.
Load Of Washing
Of course wet washing will present quite a heavy load until dry. Therefore I screwed the pulley system to an 18mm thick Main Support Beam which itself is screwed into the ceiling beams in the loft.
Locating The Ceiling Beams
To locate the beams accurately one needs access to them above. In order to screw correctly into the centre line of your beams drill a 3mm hole through the ceiling offset from one. This gives you a known datum from which to measure below and accurately locate where they run when looking from below. Having a Main Support Beam means that whether your ceiling beams run ‘north-south’ or ‘east-west’ you can choose where to put some nice sturdy 8mm Coach Bolts to support the whole lot strongly (red arrows above).


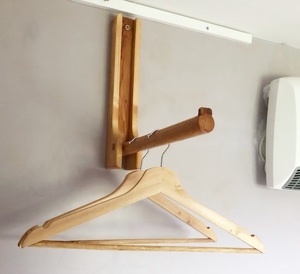
Fold Away Hanger Bar
Over The Top
The drying rails above are all very good but hanging shirts over them wastes valuable space and creases the shirts. Therefore I made this fold away Hanger Bar as a separate project.
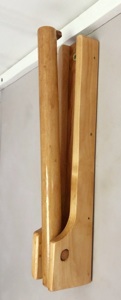
The Hanger Bar is made from a short section of broom handle. At one end a small hardwood Lip was pinned and glued in to prevent coat hangers from falling off the end (blue arrow left). Along its length I put 10-12 niches in the top edge (cyan arrows left) to encourage the coat hangers to remain equally spaced.
The Back Panel is made from three separate pieces of pine pinned and glued together. The Fulcrum is made from 10mm dowel and must be precisely drilled at right angles and through the middle of the Hanger Bar (green arrow right) - I strongly suggest using a pillar drill.


Coat Hung
As you can see the main Drying Spars are four 1200mm of 18mm dowels screwed to two old coat hangers then varnished. Letting the varnish run into the joints stops it twisting.
Roped Into It
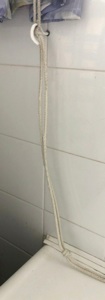
The cycle pulley system comes with its own rope (I discarded the cycle hooks that it comes with). As you can see (above left) I tied the two ends of the rope to the central two Drying Spars. These pass over the pulleys at the far end. They then drop down to two knots (just above the bath). These set the two heights that I wanted the Hanger system to be available at when hooked over an upturned hook in the wall (see pink above).
Hook
matt’s shed
mens shed
shed projects
shed ideas