Garden Slab Crane


I’m going to be boring before describing this project:
If you are not prepared to make this crane with good quality materials which have significant strength it will fail and crush your hands, arms, legs, feet and/or toes - break your bones.
Whilst moving heavy slabs you MUST wear toe-tector boots and leather gloves.
If you are not prepared to make this crane with good quality materials which have significant strength it will fail and crush your hands, arms, legs, feet and/or toes - break your bones.
Whilst moving heavy slabs you MUST wear toe-tector boots and leather gloves.
A Pick Me Up
Picking up a slab with a machine is not easy. Pavement laying workers and I use 50mm (2”) thick 600x600mm slabs which each weigh 45Kg. I am surprised that they use a hand operated suction pad to pick up and carry their slabs !
Firstly two of them lift each slab together. I could not lift this weight on my own. Secondly I didn’t want to take the risk of any suction mechanism leaking and dropping the slab on me so my system avoids both of these problems entirely. Thirdly I wanted accurate positioning of my slabs and this method is superb at that.
Grab Your Slab
The system of using two drawer ropes to close a dual-bucket grab is used for transferring aggregates and grain in ships, and I’ve seen a roadside slab-grabber with two long arms, but I’ve never seen a rope driven slab-grabber crane before (but hey maybe there is one out there).
Safety !
The Basic Ideas
Making A Grab For 600mm Slabs
This grab only fits one size of slab. Before you go on to make your crane the first thing to prove is that you can make a grab that works. You will need:
-
•4off: Cross Beams made from 45mm square mm timber. In fact I use a huge amount of this size.
-
•2off: Square Spacing Bars 45mm square.
-
•2off: Grab Jaws made from 30x30mm aluminium angle.
-
•4off: Threaded Coach Bolts M8x120mm.
-
•3off: Circular Spacing Bars made from 45mm diameter banister rail.
-
•1off: Fulcrum Rod cut from 12mm welding rod.
-
•2off: Heavy nylon rope.
-
•1off: Joining Ring - 40mm diameter x 6mm thick.
-
•2off: R-Clip. These pass through the Fulcrum Rod and are normally made of 2.5mm diameter steel wire.
-
•6off: Washers: 2off: M12 + 4off: M8.
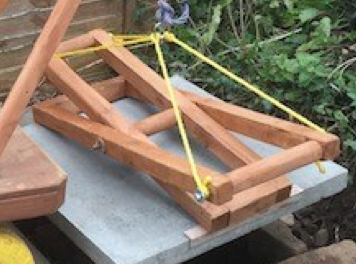
Assembling The Grab
-
1.Cut the Cross Beams 700mm long so that they over hang the slabs by 100mm.
-
2.Attach these and the Square Spacing Bars to Grab Jaws with 8 very large countersunk screws (these will carry the full weight with a serious twisting force). Notice that one pair of Cross Beams passes through the other pair symmetrically to make an X.
-
3.Cut the three Circular Spacing Bars - one will be 90mm longer than the others. In the ends of one long one and one short one drill 10mm pilot holes for the Coach Bolts. In the remaining short one drill a 14mm clearance hole from one end to the other so that the Fulcrum Rod can pass through easily. DO NOT DRILL THE HOLES IN THE CROSS BEAMS FOR THE FULCRUM ROD TO PASS THROUGH YET.
-
4.Attach the first two Circular Spacing Bars to the open ends of the Cross Beams with the Coach Bolts leaving 12mm sticking out from the rope to attach.
-
5.Place the two assemblies within one-another but without the central Circular Spacing Bar. Cross them over with the jaws either side of a test slab (they will not quite lie flat). This is almost the pick up position. With a 5mm thick strip of wood space one of the jaws 5mm further outwards. This thickness represents the tolerance with which the grab can pick up slabs that have been made slightly too large. Normally it means the jaws easily just drop over a slab before picking it up.
-
6.Make sure everything is tight and square and fully symmetrical then with several G-clamps clamp everything together leaving space to drill the hole for the Fulcrum Rod, where the Cross Beams cross, with a 10mm hole (I suggest that you start with 6mm and work up). As you haven’t put in the central Circular Spacing Bar the clamps can go anywhere and you will be able to see that you are drilling the hole for the Fulcrum Rod in the right place. POINT OF NO RETURN: Fire away.
-
7.Remove the 5mm strip of tolerance wood and the G-clamps.
-
8.Pass a length of Fulcrum Rod through the Cross Beams, and the central Circular Spacing Bar. Cut it leaving 15mm of rod sticking out each side. De-burr the cut ends. Put a washer on each side.
900

400
Michael Crane
Proceed With Safety
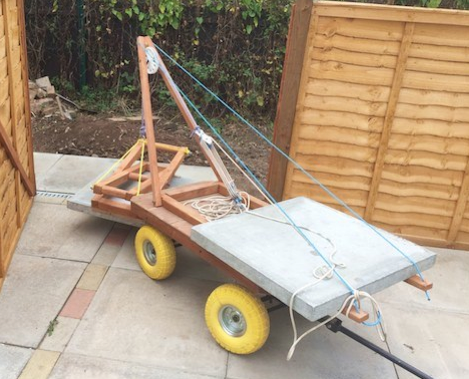
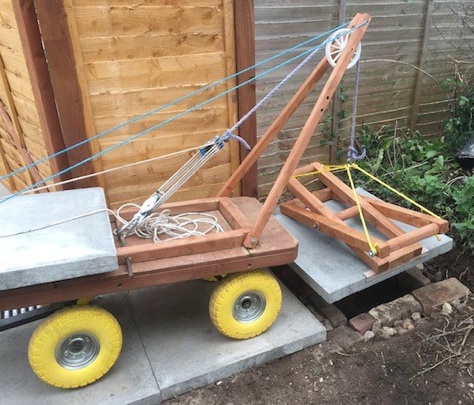
Now that the Grab is proven it’s time to make the crane proper. I have designed this to fit on the back of the Garden Trolley (see shortcut at top of page). It is comprised of four parts:
1 . Crane Base & Counter Balance
Different thicknesses of slab will weigh considerably differently therefore I decided to use the exact correct Counter Balance: another slab ! The Crane Base comprises

four 60x45mm sections of timber with a 12mm steel bar (welding rod) 400mm from the front. The bar will have one end of the winch attached in the middle.
This Crane Base rests on top of the trolley and locates in exactly the correct position thanks to a 8mm bolt that goes through the front spar and into the back of the trolley (red in picture above right) Above the non-steering wheels. Notice that during lifting, when the weight of the two slabs balance, this fixing offsets the centre of gravity towards the centre of the trolley making the whole unit inherently stable. I actually find during winching the whole trolley can tilt forward which actually aids maneuvering.


180

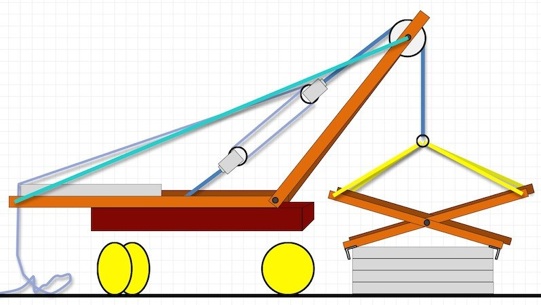

2. Jib
This I made from two pieces of 900x45x32mm timber. Working from the top down there is a small triangular piece of wood to hold the apex of the Jib together. It is screwed in place from both sides and has a hole from one side to the other which the Luffing Rope (cyan in diagram above) passes through.
The pulley is off an old push-chair and is 130mm dia.
The whole unit attaches to the Crane Base using two more M8x120 Coach Bolts. You will need to shape both the Base and the Jib to allow the whole unit to fold away compactly.

-
9.With a permanent ink pen mark where the holes for the retaining R-Clips must be drilled through the Fulcrum Bar giving 2mm free play. Remove the Fulcrum Rod to drill two holes squarely through it at each end. Place the Fulcrum Rod in position and fit securely with R-Clips.
-
10. Tie the two ropes through Joining Ring and onto the ends of the coach bolts.
-
11. Test Your grab by lifting at the Joining Ring. There is no adjustment possible. It must work reliably. If it doesn’t go get some hankies !
3. Winch
These are available with an SWL of 200Kg for a good price. The jaws at each end slide open cleverly to go round a 7mm fixing. I wanted to use mine for other things occasionally so used a carabiner. This was 8mm so have to file the jaws a little. Be sure to sheive it’s pulleys as shown and lubricate them with oil.
The Winch Tail passes over the pulley at the top of the jib and is tied to the Grab’s Joining Ring.
The operating rope is 6mm braided nylon. I had bought some automatic yacht shanks to retain the rope once a slab is lifted but found a very simple slip-knot gave far better control when lowering the slab.
Set the entire Crane on your chosen trolley and adjust the Luffing Rope so that a slab will have 50mm clearance from the trolley BUT DON’T CUT THE LUFFING ROPES YET.
Place the Counterbalance slab on the front of the trolley so that it doesn’t tip the trolley over that way ! Take the whole until to a slab. Lower the open grab onto the slab and winch up a little. The trolley might weigh down a little but it should not tip over. You can slide the Counterbalance to get this just right. Now cut the Luffing Ropes to size.
As I said I merely tie-off the Winching Rope when I transport a slab. You will find that the top ends of the Grab protruding beyond the end of the Grab Jaws gives massive grip force onto the slab. Upon release having a rounded spacer makes the jaws very convenient to lift with your hands and swing onto the trolley for transport to get your next slab.
Setting Up
* Good job that there were no doors to blow off !
Not A Lotta People Know That* !
1100

Fulcrum Rod
Jaws


matt’s shed
mens shed
shed projects
shed ideas
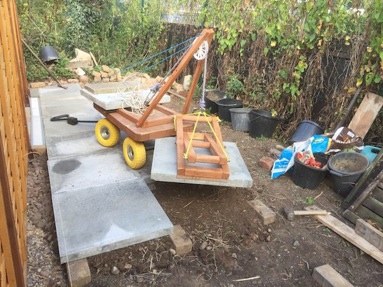
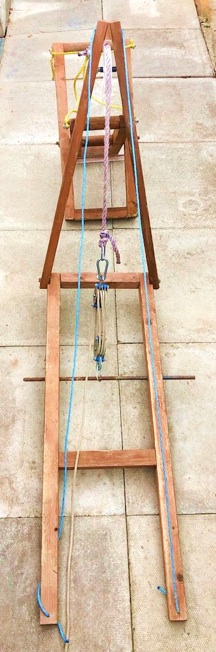
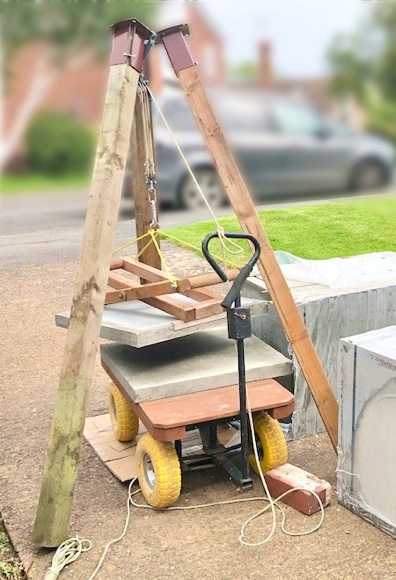
Garden Slab Crane - Tripod
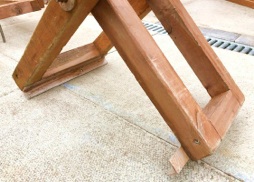
There will obviously be times when using a trolley based crane is either inappropriate or inefficient. I found one of those times to be when the slabs are first delivered in their poly-packs. The slabs are on their edge and need to be carefully laid down (onto a sheet of thick cardboard) to prevent chipping the edges then lifted into the trolley for long distance carting.
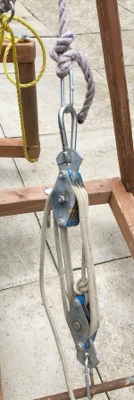
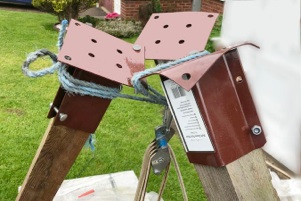
The first job is best done by hand (always wear leather gloves) but the second needs a full lift. Therefore I purchased three fence posts and three fencepost flat attachments and built an extremely strong tripod. Use three M10 bolts and locknuts but don’t do them up tightly (see inset picture right). This enables you to swing the legs to wherever is convenient to get the trolley underneath. Using thick rope, doubled, and carabiners I attached the upper pulley block. The lower pulley block attaches to the grab’s Joining Ring (above).
With a bit of practice one can load up the trolley very quickly. Don’t overload it -I loaded up only two slabs at a time to save the wheel bearings and make the whole manageable on grass. To release the grab just thump one of the handles downward and it’ll jump off !
When stacking your slabs don’t be tempted to make the piles too high. Go up to where they slide off the trolley easily which is also the maximum height that the trolley mounted crane (above) can grab up to.
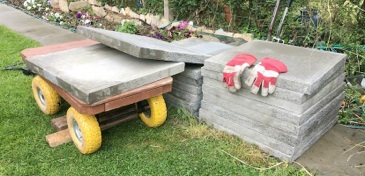
Always chock the wheels of the trolley when loading and unloading.
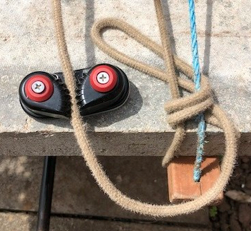
4. Winching Cleat
In order to hold the winching rope I had intended to use a fail safe yacht cam cleat (inset right). However I’ve found operationally that tucking the rope around itself enables one to slowly play-out the rope, and thereby lower the slab into position, whilst being at the business end of lifting. Thus the cleat is more trouble than it’s worth - but obviously this will be your choice..
Disclaimer
Whilst some care has been taken to check externally linked websites no responsibility is offered nor implied for the suitability, legality or reliability of content therein.